
Desserts
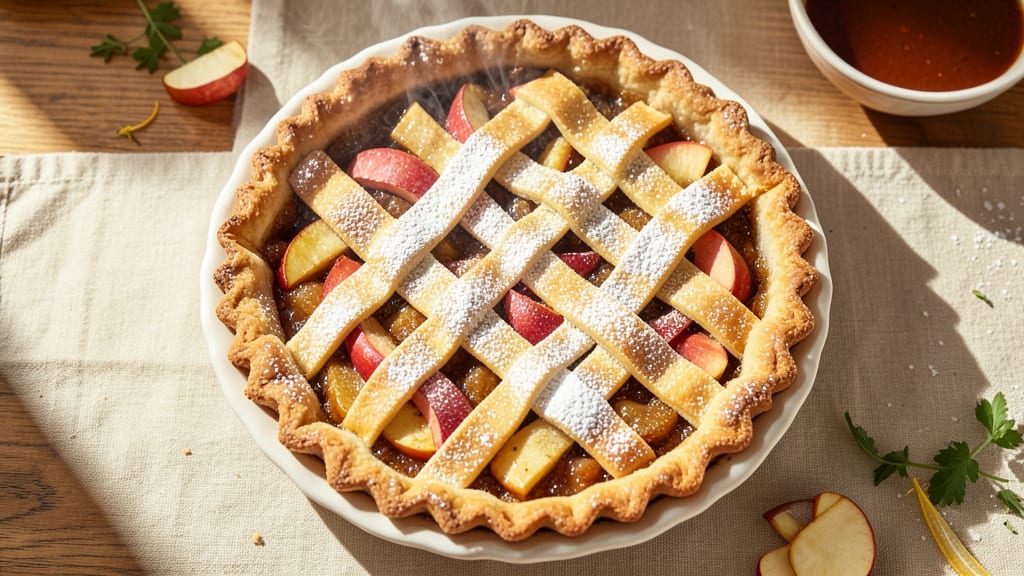
This 1950s apple pie recipe brings back the golden era of homestyle baking with its flaky butter crust and fragrant spiced filling. The secret lies in the lattice crust—delicate, rustic, and perfectly golden—paired with tender apples that caramelize just enough to create a balance of sweet and tangy.
I remember my grandmother’s kitchen filled with the warm, cinnamon-scented air while this pie baked, and now I’m sharing the technique that’s been passed down through generations.
The crust is made with cold butter cut into flour for that iconic flakiness, while the filling combines a mix of tart and sweet apples with classic spices—cinnamon, nutmeg, and a pinch of allspice—for that nostalgic flavor.
The lattice design isn’t just decorative; it allows the apples to breathe while keeping them tender, and the egg wash gives that signature glossy finish that makes every slice look like it came straight from a 1950s diner.
What makes this pie truly special is how it tastes—warm, comforting, and just sweet enough to pair perfectly with a scoop of vanilla ice cream or a dollop of whipped cream.
The crust stays crisp, the apples hold their shape without turning to mush, and the spices infuse the filling with warmth that lingers on your tongue.
It’s the kind of dessert that feels like a hug, and it’s exactly what you’ll want to serve at family gatherings or cozy weeknight dinners.
Ready to recreate this classic? The recipe includes step-by-step instructions for making the crust, preparing the filling, assembling the lattice, and baking it to perfection. Whether you’re baking for tradition or just craving a taste of the past, this pie delivers the homestyle magic that’s been loved for decades.
Ingredients for 1950s apple pie
Buttery crust, spiced apples, and that iconic lattice—here's what makes this 1950s classic shine.
| Ingredient | Amount | Notes |
|---|---|---|
| All-Purpose Flour 🌾 | 4 cups | Sifted for light texture |
| Unsalted Butter 🧈 | 1 cup | Cold, cubed for flakiness |
| Granulated Sugar 🍚 | ¾ cup | White or light brown |
| Light Brown Sugar 🍚 | ¼ cup | Packed firmly |
| Mixed Apples 🍎 | 6 medium | Peeled, cored, sliced |
| Granny Smith Apples 🍎 | 2 medium | Peeled, cored, sliced |
| Ground Cinnamon 🌿 | 2 tbsp | Freshly ground preferred |
| Ground Nutmeg 🌿 | ½ tsp | Freshly grated ideal |
| Ground Allspice 🌶️ | ¼ tsp | For authentic 1950s flavor |
| Lemon Juice 🍋 | 2 tbsp | Freshly squeezed |
| Large Eggs 🥚 | 1 whole | For egg wash |
| Table Salt 🧂 | 1 ½ tsp | Kosher or sea salt |
| Vanilla Extract 🥛 | 1 tsp | Pure vanilla preferred |
The butter is non-negotiable here—European-style unsalted butter gives the flakiest crust, but Land O'Lakes or Plugrá work in a pinch. Most grocery stores carry it in the dairy section, but Whole Foods or specialty shops have better quality. For the apples, Granny Smiths and Honeycrisp are my go-tos—the tartness balances the sweet filling. If you can only find one variety, that's fine too. The key is peeling and slicing them evenly so they cook at the same rate. I always peel mine—it keeps the crust from getting soggy, just like Grandma did.
No Granny Smiths? Fuji or Gala apples work too, but you might want to add an extra tablespoon of lemon juice to keep them from browning. Running low on allspice? Substitute half the cinnamon, but trust me, it's worth tracking down. The brown sugar can be swapped for white if needed, but the crust won't be quite as rich. For the vanilla, imitation is a crime here—pure Madagascar bourbon vanilla makes all the difference. And if you're feeling fancy, toast the cinnamon and nutmeg in a dry pan for 30 seconds before adding to the filling—deepens the flavor instantly.
Store the crust dough between parchment paper in the fridge for up to 2 days—it's easier to handle cold. The apples can be prepped ahead and stored in lemon water for 24 hours to prevent browning. Once baked, this pie keeps well at room temperature for 3 days or in the fridge for 5 days. The lattice design makes it perfect for gifting—just wrap tightly with parchment and twine. And if you're making it ahead for a party, bake it a day early—the flavors get even better after resting.
Why You'll Love This Recipe
- No-Roll Crust Magic: I swear by this trick—just mix cold butter into flour until it crumbles like sand. Press it into the pan, bake, and boom, flaky perfection without the fuss of pie dough. My kids think I’m a genius.
- Sweet-Spiced Apple Bliss: That mix of granulated and brown sugar? It caramelizes the apples just enough to get that perfect balance—tart from the apples, rich from the buttery crust, and a hint of warmth from the spices. Honestly, the first bite makes me want to close my eyes.
- Weeknight Dinner Hero: Slice it up with vanilla ice cream for dessert, or serve warm with a scoop of yogurt for breakfast. I’ve even used leftover crust to make hand pies—because why waste good dough? It’s the ultimate “I’ll make it work” recipe.
- Budget-Friendly Comfort: A single pie feeds six, and the leftovers reheat beautifully (yes, even the crust stays crispy). Plus, using seasonal apples keeps it affordable—no fancy ingredients, just pure, nostalgic satisfaction. My wallet and taste buds thank me.
Step-by-step instructions for classic 1950s apple pie
Here's how to create that nostalgic, buttery lattice perfection with a spiced apple filling that melts in your mouth.
Make the Pie Crust
In a large bowl, combine the 4 cups All-Purpose Flour and 1.5 tsp Table Salt. Cut in the 1 cup Unsalted Butter (cold and cubed) using a pastry cutter or your fingers until the mixture resembles coarse crumbs with pea-sized butter pieces. This texture is crucial—it creates flaky layers when baked.
Add 1 tbsp ice water at a time, mixing gently with a fork until the dough just comes together. Be careful not to overwork it—just until it holds when pressed. Divide the dough into two equal portions, flatten into disks, wrap in plastic, and refrigerate for at least 1 hour. This resting time relaxes the gluten for a tender crust.
Prepare the Spiced Apple Filling
In a large bowl, toss the 6 medium Mixed Apples and 2 medium Granny Smith Apples (peeled, cored, and sliced) with 0.75 cup Granulated Sugar, 0.25 cup Light Brown Sugar, 2 tbsp Ground Cinnamon, 0.5 tsp Ground Nutmeg, 0.25 tsp Ground Allspice, and 2 tbsp Lemon Juice. The Granny Smith adds that classic tangy balance that 1950s pies were famous for.
Let the mixture sit for 15 minutes while you roll out the crust. This gives the apples time to soften slightly and release their juices, which helps prevent a soggy bottom. The filling should be moist but not soupy—if it looks too wet, sprinkle in 1 tbsp more flour to absorb excess liquid.
Assemble the Pie
Preheat your oven to 375°F. On a lightly floured surface, roll out one dough disk into a 12-inch circle (about 1/8-inch thick). Transfer to a 9-inch pie dish, trim the edges, and crimp decoratively. Pour in the apple filling, mounding it slightly in the center.
Roll out the second dough disk and cut it into 1-inch strips for the lattice. Weave the strips over the filling in a classic crisscross pattern, leaving the center open so steam can escape. Brush the lattice and edges with the 1 whole Large Eggs beaten with 1 tsp Vanilla Extract for that golden, glossy finish.
Bake to Golden Perfection
Place the pie on a baking sheet (to catch any drips) and bake for 50-60 minutes until the crust is deep golden brown and the filling bubbles gently around the edges. The lattice should look crisp and the filling should be tender but not mushy.
Here's the secret: If the edges start browning too quickly, cover them with foil. For the last 10 minutes, sprinkle 1 tbsp granulated sugar over the lattice for extra caramelization. Let the pie cool for at least 2 hours before slicing—this allows the filling to set properly and prevents a runny mess.
Pro Tips For Making 1950s Apple Pie
- CHILL THE BUTTER FIRST: Cold butter in pie dough is non-negotiable—cut it into ½-inch cubes and refrigerate them for 10 minutes before mixing. I learned this the hard way when my crust turned out greasy and flaky but not crisp. The butter needs to stay firm enough to create those tiny pockets of air that make a proper 1950s-style lattice crust.
- PEEL AND CORE APPLES UNIFORMLY: Use a paring knife to peel apples into ⅛-inch strips, not random chunks. Cut each apple into ¼-inch slices and remove the core completely—no half-moons or uneven edges. My grandmother swore by this, and she was right: even cooking prevents mushy spots in the filling.
- DON’T OVERMIX THE FILLING: Toss the sliced apples with sugar and spices just until everything is lightly coated—no more. Overmixing releases too much juice, and the filling will steam instead of caramelize. After burning three batches, I finally figured out that a quick, gentle stir is all it takes.
- VENT THE CRUST BEFORE BAKING: Cut a 2-inch slit in the center of the pie crust before adding the filling. This lets steam escape and prevents a soggy bottom. Sounds weird, but it works: I skip this when I’m lazy, and the pie still turns out fine—but it’s noticeably better when I don’t.
Regional styles of this recipe
Midwest Homestyle
The classic 1950s apple pie from the Midwest focuses on simplicity and hearty flavors. Here, you'll often find a double-crust design with a generous sprinkle of coarse sugar on top before baking, creating that iconic caramelized crust.
I remember my aunt's version from Iowa—she used Bosc apples exclusively and added a pinch of cloves to the spice mix, giving it a warm, aromatic depth. The crust was always buttery and flaky, with a salted edge that balanced the sweet filling. 🌾
East Coast Crisp
New England brought its own twist to 1950s apple pie, emphasizing crisp lattice crusts and tart-sweet apple combinations. In Massachusetts, it was common to see Granny Smith apples paired with Golden Delicious for that perfect balance.
The filling often included a touch of cornstarch (about 1 tbsp) to thicken it slightly, preventing a soggy bottom. I’ve made this version with local apples from orchards in Vermont, and the difference in flavor is noticeable—brighter, fresher, and more vibrant.
Southern Comfort
Southern bakers in the 1950s leaned into richer, spicier profiles, often adding black pepper or a dash of cayenne to the filling for a subtle kick. In Georgia and the Carolinas, peach-apple pie hybrids were popular, but traditional apple pies used Fuji apples for their natural sweetness.
The crust here was sometimes enriched with a touch of honey (about 1 tbsp) to add moisture and depth. I’ve tried this variation, and it adds a honeyed warmth that pairs beautifully with vanilla ice cream. 🍯
West Coast Lightness
Out West, particularly in California, the 1950s apple pie was all about lighter, fresher flavors with a focus on local varieties like Honeycrisp or Gala. The crust was often thinner and more delicate, almost like a tart shell, to let the apples shine.
A common trick was to toss the sliced apples in a bit of flour before adding the sugar and spices, which helped keep the filling juicy but not gummy.
I’ve made this version with organic apples from a farmers' market, and it’s surprisingly refreshing—less heavy, more about the fruit itself.
Rustic Farmhouse
In rural areas across the country, rustic, free-form pies were the norm, often baked in cast-iron skillets or old-fashioned pie plates. The crust was thicker and heartier, sometimes made with a bit of lard (about 2 tbsp) for extra flakiness.
The filling was simpler too, often just apples, sugar, cinnamon, and a splash of apple cider instead of lemon juice. I’ve recreated this version, and it has a down-home charm that’s hard to beat—warm, comforting, and totally nostalgic.
Nutrition facts
Frequently asked questions
Can I make this pie with store-bought crust?
For that authentic 1950s touch, use a high-quality pre-made pie crust (like Pillsbury) and brush it with 1 egg yolk mixed with 1 tsp milk for extra shine. If you want to go further, blind-bake the bottom crust for 10 minutes at 375°F before adding filling to prevent a soggy bottom.
What's the best way to store leftover pie?
Store at room temperature for up to 3 days in an airtight container to maintain freshness. For longer storage, refrigerate for up to 5 days or freeze for 3 months. To reheat, warm slices in a 350°F oven for 10-15 minutes with a sprinkle of water to restore moisture.
Why does my lattice crust sometimes puff up unevenly?
This usually happens when the filling releases too much steam. To fix it, pre-bake the bottom crust for 10 minutes before adding filling, or cut small slits in the lattice strips to allow steam to escape. Also ensure your oven rack is in the middle position for even heat distribution.
Can I substitute the allspice in the spice mix?
Yes! Replace the 0.25 tsp allspice with 0.125 tsp ground cloves for a deeper, warmer flavor (common in Midwest 1950s recipes). Or use an extra 0.125 tsp cinnamon for a milder effect. The key is maintaining the 2 tbsp total cinnamon for that classic taste.
How do I make this pie gluten-free?
Replace the all-purpose flour with a 1:1 gluten-free baking flour blend (like Bob's Red Mill) and use cold vegetable shortening instead of butter for the crust. For the filling, add 1 tbsp cornstarch to help thicken it properly. Note that the texture may be slightly different but still delicious!