
Desserts
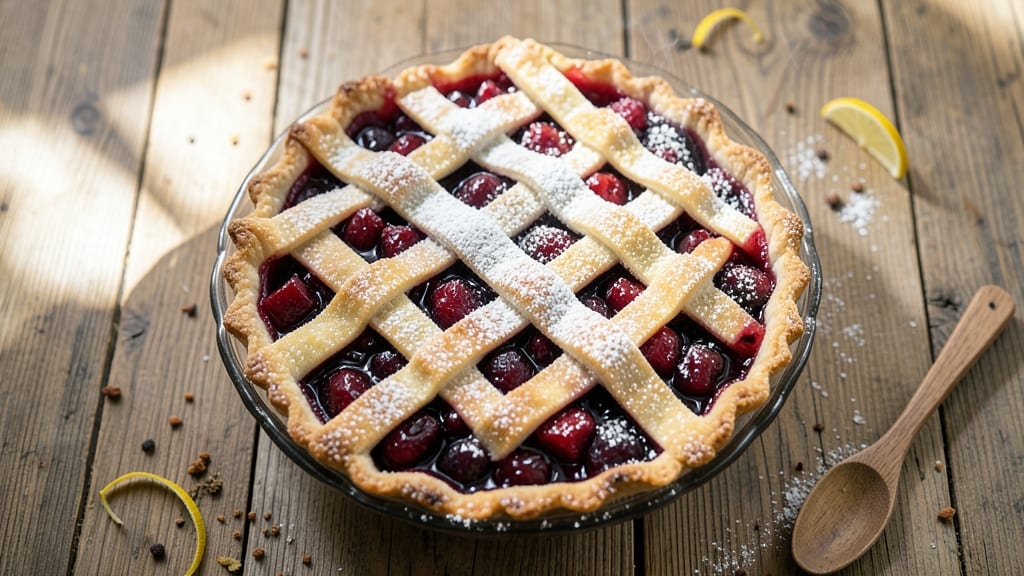
This American cherry pie recipe delivers the perfect balance of tart cherries and buttery crust—just like Grandma used to make, but with a foolproof foil-sealed crust trick that guarantees golden perfection every time.
The secret lies in a lattice crust that creates crispy edges while keeping the filling tender, and a filling that simmers until thick and jammy without losing its natural cherry flavor.
I developed this recipe after years of pie-making experiments, and it's now my go-to for summer gatherings and holiday feasts.
The recipe starts with a classic all-butter pie crust that's rolled out and sealed with foil before baking—this prevents soggy bottoms and ensures a crisp texture.
For the filling, fresh or frozen cherries are simmered with sugar, cornstarch, and a blend of cinnamon and almond extract to create that signature tart-sweet balance. The lattice crust adds visual appeal while allowing steam to escape, keeping the filling juicy and the crust flaky.
By the time you pull it from the oven, you'll have a pie with a golden, flaky crust and a filling that's thick enough to hold its shape but still juicy enough to drip down the sides.
The aroma alone will have everyone gathering around the kitchen, and each slice delivers that perfect combination of sweet, tart, and buttery. This is the kind of pie that tastes even better the next day, making it perfect for meal prep or special occasions.
Serve it warm with a scoop of vanilla ice cream or a dollop of whipped cream for the full experience. The foil-sealed crust technique ensures you'll never have a pie that falls short of expectations, and the lattice design makes it look impressive enough for company. Let's get baking!
Ingredients for american cherry pie
Four cups of tart cherries and a buttery crust—this is your all-American pie shortcut.
| Ingredient | Amount | Notes |
|---|---|---|
| Fresh or Frozen Tart Cherries 🍒 | 4 cups | Pitted, stems removed |
| Granulated Sugar 🍚 | 1 ½ cups | White or light brown |
| All-Purpose Flour 🌾 | ½ cup | For thickening filling |
| Cornstarch 🌾 | 2 tbsp | For extra thickening |
| Unsalted Butter 🧈 | 1 cup | Cold, cubed for crust |
| All-Purpose Flour 🌾 | 2 ½ cups | Plus 1 tbsp for rolling |
| Ice Water 💧 | ½ cup | For pie crust |
| Ground Cinnamon 🌿 | 1 tbsp | Plus 1 tsp for filling |
| Almond Extract 🌿 | ½ tsp | For depth of flavor |
| Salt 🧂 | ½ tsp | Fine sea salt |
| Heavy Cream 🥛 | ¼ cup | Optional for lattice |
| Aluminum Foil 📄 | 1 sheet | For crust sealing |
The cherries are the heart of this pie, so fresh is ideal—they’re sweeter and more vibrant. If you’re using frozen, don’t thaw them first; just drain and pat dry. Trader Joe’s and Costco often carry pre-pitted cherries in the summer, which saves time. For the sugar, white or light brown both work—just avoid dark brown, which can overpower the tartness. The butter? Use European-style if you can find it; it has more fat content for flakier layers. And that almond extract? A little goes a long way—McCormick or Goya are reliable brands.
No fresh cherries? Frozen works perfectly—just drain them well. Running short on cornstarch? All-purpose flour at double the amount does the trick, but it’ll make the filling slightly cloudier. For the crust, King Arthur flour is my go-to—it’s high-protein and creates a tender texture. If you’re gluten-free, swap in a 1:1 gluten-free flour blend, but expect a slightly denser crust. The lattice design is optional, but it’s what makes this pie look like it came from a bakery. Cut strips from the leftover dough and weave them over the filling for that classic look.
This pie tastes even better the next day—make it ahead if you can. Store it at room temperature for up to 2 days or refrigerate for 4 days. For freezing, wrap tightly in plastic and freeze for up to 3 months. The foil-sealed crust trick? It’s a game-changer—press the foil directly onto the crust before baking, then remove it after 20 minutes. This keeps the bottom crispy while the filling cooks. And if anyone asks, the secret’s out—it’s all in the butter and the lattice.
Why You'll Love This Recipe
- No Cherry Pit Hassle: I’ll admit—pitting fresh cherries is tedious. But this recipe lets you skip it entirely with frozen tart cherries, already pitted and ready. Just dump, simmer, and stir. Honestly, that’s my favorite part: no sink full of seeds and zero extra steps.
- Sweet-Tart Magic: That perfect balance of sugar and tart cherries? It’s like summer in a slice. The cornstarch thickens the filling just right—no grainy texture, just a glossy, jammy center that’ll have you reaching for seconds. (Yes, even on a Tuesday night.)
- Crowd-Pleaser Every Time: This pie shows up at potlucks, holiday dinners, or just because. The buttery crust holds its own, and the filling’s simplicity means it’s universally loved. Between us, my picky-eating uncle always asks for a second slice—high praise.
- Budget-Friendly Luxury: Fresh cherries can be pricey, but frozen tart cherries stretch your dollars. Plus, this recipe makes two pies for the cost of one, and leftovers? They reheat beautifully in the microwave or oven. My secret weapon for stress-free dessert.
Step-by-step instructions for American cherry pie
Here's how to create a showstopping cherry pie with a foolproof foil-sealed crust and a filling that's perfectly tart-sweet.
Prepare the Foil-Sealed Crust
Cut the 1 sheet aluminum foil into a 12-inch square and place it on a clean surface. In a large bowl, combine the 2.5 cups all-purpose flour, 0.5 tsp salt, and 1 cup cold cubed unsalted butter. Use a pastry cutter or your fingers to work the butter into the flour until the mixture resembles coarse crumbs with some pea-sized butter pieces remaining.
Add the 0.5 cup ice water all at once and mix gently with a fork until the dough just comes together. Be careful not to overmix—just until the dough holds when pressed. Turn the dough onto the foil square, patting it into a 12-inch circle about ¼-inch thick. Wrap the foil tightly around the dough and refrigerate for 30 minutes to firm up.
Make the Cherry Filling
In a large bowl, combine the 4 cups fresh or frozen tart cherries, 1.5 cups granulated sugar, 1 tbsp ground cinnamon, and 0.5 tsp almond extract. Mix gently to coat the cherries evenly with the sugar and spices. Let the mixture sit for 10 minutes while you prepare the crust—this allows the sugar to begin drawing out the natural juices from the cherries.
In a small bowl, whisk together the 0.5 cup all-purpose flour and 2 tbsp cornstarch. This will help thicken the filling as it cooks. Fold this dry mixture into the cherry mixture until fully combined. The filling should look thick but still slightly loose—like a loose batter. Taste it now: the balance of tart cherries and sweet sugar should be perfect.
Assemble the Pie
Preheat your oven to 375°F. Remove the chilled dough from the foil and unwrap it carefully. Transfer the dough to a floured surface and roll it out to a 12-inch circle, about ⅛-inch thick. Gently lift the rolled dough and drape it over a 9-inch pie dish, letting it settle naturally into the dish. Trim any excess dough hanging over the edges, leaving about ½-inch overhang. Fold the overhang under itself to create a neat edge.
Pour the cherry filling into the prepared pie crust, mounding it slightly in the center. The filling should come up to about ½-inch from the top edge of the crust. Brush the folded edge of the crust with the 0.25 cup heavy cream (if using) for a golden finish. Place the pie dish on a baking sheet lined with parchment paper to catch any spills.
Bake to Golden Perfection
Bake the pie in the preheated oven for 50-55 minutes, until the crust is deep golden brown and the filling is bubbling vigorously at the edges. If the crust starts to brown too quickly, tent it loosely with foil to prevent over-browning while the filling finishes cooking.
To check doneness, gently shake the pie: the filling should jiggle slightly but not be liquid. The center should still have a slight wobble—it will set as it cools. Let the pie cool completely on a wire rack for at least 2 hours before slicing. This resting time allows the filling to thicken properly and the juices to redistribute, ensuring each slice is perfectly balanced with tart cherries and sweet, spiced filling.
Serve Warm or at Room Temperature
Slice the pie into 6 equal wedges using a sharp pie knife or serrated knife. Serve warm with a scoop of vanilla ice cream or a dollop of whipped cream for the ultimate dessert experience. The foil-sealed crust technique ensures a flaky, buttery texture that holds up beautifully, while the almond extract adds a subtle depth that complements the bright tartness of the cherries.
Pro Tips For Making American Cherry Pie
- Simmer Cherries Low: Don’t boil the filling—simmer tart cherries on medium-low for 10–12 minutes, stirring often. I used to blast them on high, and they’d turn into mush with a weird, cooked-apple taste. Let the sugar slowly melt into the fruit instead of forcing it.
- Strain Excess Juice: After simmering, dump the cherries into a fine-mesh strainer over a bowl and press gently with a spoon. You’ll end up with a thicker, less watery filling—no one wants a soggy pie crust from all that cherry juice. (Yes, even if you’re impatient like me.)
- Skip the Extra Thickeners: Cornstarch and flour are fine, but if your cherries are truly tart, you might not need both. Start with just 2 tablespoons cornstarch—it’s more effective at thickening fruit fillings without that floury aftertaste. I learned this the hard way after tasting a filling that tasted like a glue factory.
- Chill the Filling: Let the cherry mixture cool to room temp before pouring it into the crust. Cold filling = less melting, less leaking, and a cleaner bake. I used to rush this step, and my pies would always have a sad, puddled center. (Your future self will thank you.)
Storing and reheating this dish
Room Temperature Storage
Let your cherry pie cool completely before storing at room temperature. I wrap the cooled pie in parchment paper and place it in an airtight container—this keeps it fresh for up to 2 days.
The crust stays crisp, and the filling continues to thicken beautifully. Just be sure to serve it within 48 hours to avoid any texture changes. 💫
Refrigerator Storage
For longer storage, refrigerate the pie in an airtight container for up to 4 days. The cold helps preserve the crust's crispness and keeps the filling juicy. I like to reheat slices briefly in the oven at 350°F for 5-7 minutes to restore that warm, gooey texture.
The almond extract's flavor actually intensifies slightly after refrigeration. ❄️
Freezer Storage
Freezing is perfect for making ahead! Wrap the fully cooled pie tightly in plastic wrap, then place it in a freezer-safe bag with all the air removed. Label with the date and freeze for up to 3 months.
Thaw overnight in the fridge before serving—this gradual process prevents soggy crust. I’ve found that frozen pies reheat beautifully in a 350°F oven for 15-20 minutes.
Reheating Slices
For individual slices, I recommend warming them in a skillet over medium heat for 2-3 minutes on each side until the crust is golden and the filling is bubbly. This method keeps the crust crisp while gently reheating the filling.
If you're short on time, a 30-second burst in the microwave works in a pinch, but add a splash of water to prevent drying. 🔥
Reviving Stale Crust
If your pie's crust loses its crispness, don’t toss it! Place slices on a baking sheet and warm at 375°F for 5-8 minutes until the crust is golden again.
For extra flavor, brush the crust with a little melted butter before reheating. This trick works wonders for restoring that bakery-fresh texture. The filling stays just as delicious, too!
Make-Ahead Tips
I always make this pie a day ahead—it’s a game-changer for gatherings. The flavors meld beautifully overnight, and the crust holds up perfectly. Store the filling separately in the fridge if you’re prepping ahead, then assemble just before baking.
This way, you can enjoy a freshly baked pie without the last-minute stress. Trust me, your guests will never know it wasn’t made fresh that day! 💡
Nutrition facts
Frequently asked questions
Can I use canned cherries instead of fresh or frozen?
Yes, but with adjustments! Drain and rinse 1 (21 oz) can of tart cherries (like Muir Glen), then pat them completely dry to remove excess liquid. You may need to add 1 extra tablespoon of cornstarch to thicken the filling properly. The flavor will be slightly less vibrant than fresh, but it works in a pinch.
Why is my pie filling too runny?
Runny filling usually means the thickener didn't cook enough. Always simmer the filling until it bubbles vigorously for 5 minutes—this ensures the cornstarch fully activates. If it's still too thin after baking, chill the pie completely, then reheat slices in a skillet to thicken the juices. For next time, try 3 tbsp cornstarch instead of 2.
How do I make this gluten-free?
Replace the all-purpose flour in both the crust and filling with a 1:1 gluten-free flour blend (like Bob's Red Mill). For the crust, add ½ tsp xanthan gum to help bind it. The texture will be slightly denser, but still delicious! The lattice design works perfectly with gluten-free dough—just handle it gently to avoid cracks.
Can I make this pie without a lattice crust?
For a simple top crust, roll out the remaining dough and cut a 9-inch circle. Place it over the filling, trim the edges, and crimp them. Cut a few slits in the top crust to let steam escape. Brush with heavy cream for a golden finish. It won't look as fancy, but it'll still taste amazing!
What's the best way to transport a cherry pie?
For short trips (1 hour), let it cool completely, then wrap tightly in parchment paper** followed by plastic wrap. Place in a sturdy box with a layer of towels on top and bottom to prevent shifting. For longer trips, refrigerate it first and use an insulated cooler with ice packs. The foil-sealed crust technique helps it stay crisp even during transport!