
Desserts
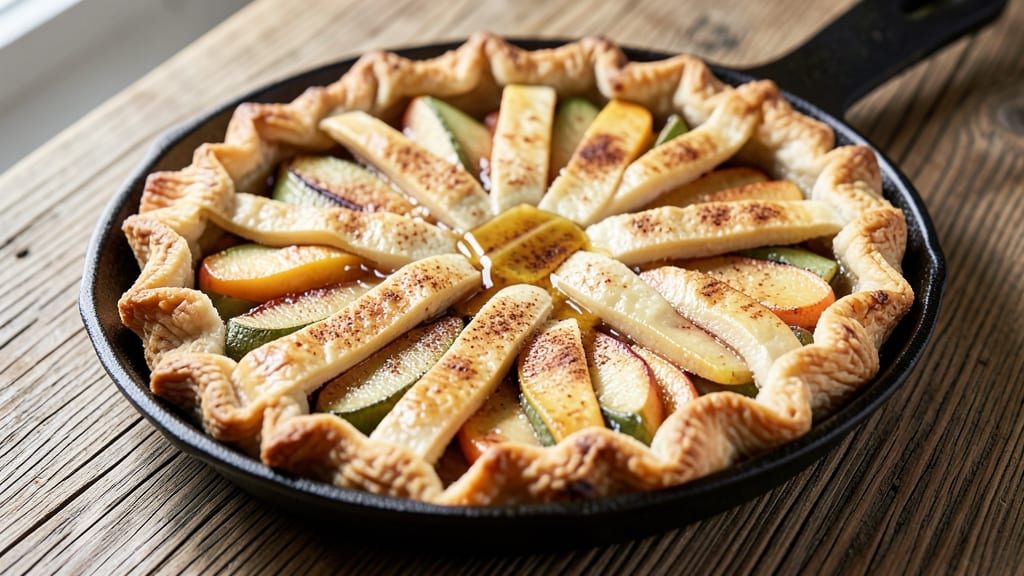
This apple pan pie recipe delivers the perfect balance of warm cinnamon, buttery crust, and tender apple filling that tastes like autumn in every bite. The secret lies in a foolproof crust—whether homemade or store-bought—and a filling that caramelizes just enough to create a luscious, spiced apple sauce.
I’ve perfected this recipe over years of baking, ensuring the crust stays crisp at the edges while remaining tender inside, with apples that stay juicy yet break down just enough to create that signature pie texture.
The magic happens in the filling, where a mix of tart and sweet apples—like Granny Smith and Honeycrisp—cooks down with cinnamon, nutmeg, and a touch of lemon juice to brighten the flavors.
A sprinkle of brown sugar and cornstarch thickens the filling as it bakes, creating a sauce that’s neither too runny nor too dry. The crust, whether rolled out from scratch or pressed into a store-bought pie shell, forms a golden, flaky base that holds up beautifully to the filling’s weight.
By the time it emerges from the oven, you’ll have a pie with a perfectly golden crust, a filling that’s spiced to perfection, and a caramelized top that’s just slightly crisp.
The aroma alone—warm cinnamon, buttery pastry, and ripe apples—will have everyone gathering around the table. This isn’t just dessert; it’s a centerpiece that feels like a hug in pie form.
Serve it warm with a scoop of vanilla ice cream or a dollop of whipped cream for the full experience. The best part? This recipe scales easily, so you can make it for a family gathering or save half for later—though I can’t promise it’ll last that long.
Let’s get baking!
Ingredients for apple pan pie
The perfect mix of crisp apples, buttery crust, and warm spices for an autumn classic.
| Ingredient | Amount | Notes |
|---|---|---|
| Apples (Granny Smith and Honeycrisp) 🍎 | 4 medium | Peeled, cored, sliced thin |
| All-Purpose Flour 🌾 | 2 ½ cups | For pie crust, spooned and leveled |
| Unsalted Butter 🧈 | 1 cup | Cold, cubed for crust |
| Granulated Sugar 🍚 | ¾ cup | For crust and filling |
| Brown Sugar 🍯 | ½ cup | Packed, for filling |
| Ground Cinnamon 🌿 | 2 tbsp | For filling, plus extra for topping |
| Ground Nutmeg 🌿 | ½ tsp | Freshly grated preferred |
| Lemon Juice 🍋 | 1 tbsp | Freshly squeezed |
| Cornstarch 🌾 | 2 tbsp | For thickening filling |
| Salt 🧂 | ½ tsp | Fine sea salt |
| Vanilla Ice Cream 🍦 | 1 ½ cups | For serving, optional |
| Heavy Cream 🥛 | ¼ cup | For whipped topping, optional |
The apples are everything here. Granny Smith for tartness and Honeycrisp for sweetness—those are my go-tos, but any mix of tart and sweet works. Trader Joe's usually has great Honeycrisp, and Granny Smith is easy to find at any grocery store. Look for firm apples with no bruises. If you can't find Honeycrisp, Fuji or Gala are solid backups. Slice them thin and toss with lemon juice right away to keep them from browning while you prep the crust. The crust? I always use Crisco shortening for extra flakiness, but butter gives that classic flavor.
No Granny Smith? Green apples like Braeburn work in a pinch. Short on Honeycrisp? Pink Lady or Jonagold add nice sweetness. The crust can be store-bought if you're short on time—just skip the extra butter and let the filling do the work. For the spices, Penzeys has amazing ground cinnamon and nutmeg, but the regular grocery store stuff is fine too. If you're feeling fancy, toast the spices in a dry pan for 30 seconds to wake up the flavors. The cornstarch is key for that perfect thick-sauce texture—don't skip it, even if your apples are super juicy.
Apples can be prepped ahead and stored in the fridge for 2 days before baking. The crust dough keeps for 3 days wrapped in plastic. Once baked, this pie stays fresh for 4 days at room temperature or 1 week in the fridge. Freeze the whole pie (without ice cream) for up to 3 months. I always make a double batch—one for now, one for later. The leftovers? Warm them up with a splash of cream and they taste even better the second time around.
Why You'll Love This Recipe
- Foolproof Crust: I swear by this butter-flour crust—no rolling pin, no fuss. Just cut the cold butter into flour until it looks like crumbs, then press it into the pan. It’s sturdy enough to hold those juicy apples without falling apart.
- Sweet-Savory Magic: Granny Smith’s sharp bite and Honeycrisp’s melt-in-your-mouth sweetness? That’s the combo that makes this pie ridiculously good. A sprinkle of brown sugar caramelizes into the crust, and the buttery layers? Pure satisfaction.
- Weeknight to Potluck: Make it for a quick dinner or double the batch for a holiday gathering. The filling stays warm for hours, and the crust reheats beautifully. Honestly, I’ve served it at brunch, picnics, and even as a dessert after Thanksgiving—it’s that versatile.
- Leftovers You’ll Crave: This pie actually tastes better the next day. The apples soften into a jammy goodness, and the crust gets just crispy enough to cut through. I’ll be real: I’ve reheated slices for breakfast with yogurt, and no one’s ever complained.
Step-by-step instructions for warm spice and buttery crust harmony
Here's how to assemble this comforting dessert with layers of crispy crust and spiced apple filling.
Prepare the Apple Filling
Peel, core, and slice the 4 medium Apples (Granny Smith and Honeycrisp) into ¼-inch thick slices. The Granny Smith adds tartness while the Honeycrisp brings sweetness—this balance is key. Toss the sliced apples immediately with the 1 tablespoon Lemon Juice to prevent browning and maintain their bright flavor.
In a large mixing bowl, combine the apple slices with the 0.5 cup Brown Sugar, 2 tablespoons Ground Cinnamon, 0.5 teaspoon Ground Nutmeg, and 2 tablespoons Cornstarch. Mix gently but thoroughly to coat each slice evenly. The cornstarch will help thicken the filling as it cooks, preventing a runny center. Let this mixture sit for 10 minutes while you prepare the crust—this allows the spices to penetrate the apples and develop deeper flavor.
Make the Pie Crust
In a food processor, pulse the 2.5 cups All-Purpose Flour with the 0.5 teaspoon Salt until combined. Add the 1 cup Unsalted Butter (cold and cubed) and pulse until the mixture resembles coarse crumbs with pea-sized butter pieces remaining. This texture is crucial—it creates flaky layers in the crust.
Sprinkle 2-3 tablespoons of ice water, one at a time, while pulsing until the dough just comes together when pressed. The dough should hold its shape when gently squeezed but not be sticky. Divide the dough into two equal portions, flatten each into a disk, wrap in plastic, and refrigerate for 30 minutes. Chilling relaxes the gluten and makes rolling easier.
Assemble the Pie
Preheat your oven to 375°F. Roll out one disk of dough on a lightly floured surface to fit a 9-inch pie pan, about ⅛-inch thick. Press the dough gently into the pan, letting it extend slightly up the sides. Trim any excess dough hanging over the edge. For extra flaky layers, I like to crimp the edges using a fork or my fingers, pressing down firmly to seal.
Transfer the prepared apple mixture to the crust-lined pan and spread it evenly in a single layer. The apples should be packed snugly but not forced into the crust. Sprinkle the 0.75 cup Granulated Sugar evenly over the top—this caramelizes during baking, adding sweetness and color. Roll out the second dough disk and place it directly on top of the apples, pressing lightly to create a seal. Cut a few small slits in the top crust to allow steam to escape.
Bake to Golden Perfection
Place the assembled pie on a baking sheet (to catch any drips) and bake for 45-50 minutes until the crust is deep golden brown and the filling is bubbling through the slits in the top crust. The edges should be crisp, and the filling should be thickened but still slightly jiggly in the center—this indicates it's not overcooked.
Remove the pie from the oven and let it cool on a wire rack for at least 2 hours before serving. This resting period allows the filling to set completely and prevents the crust from becoming soggy. For an extra touch, dust the top with additional cinnamon while still warm.
Serve with Classic Pairings
Slice the pie into 6 equal wedges and serve warm with the 1.5 cups Vanilla Ice Cream on the side. For a lighter option, whip the 0.25 cup Heavy Cream until soft peaks form and dollop it over each slice. The contrast of warm pie with cold ice cream or whipped cream makes every bite even more satisfying. Store any leftovers in the refrigerator for up to 3 days, but I promise you won't have any leftovers!
Pro Tips For Making Apple Pan Pie
- Preheat That Pan: I learned this the hard way—skipping a hot skillet for the butter and flour mix means you’ll end up with a doughy, undercooked crust instead of a golden, flaky layer. Get that pan screaming hot (medium-high) for 2-3 minutes before adding the butter—yes, even if you’re impatient like me.
- Slice Apples Thin: Granny Smiths and Honeycrisp are both firm, so thick slices turn mushy while the crust browns. Aim for ¼-inch slices, toss them with a pinch of sugar right after cutting, and let them sit for 10 minutes—this prevents them from turning to applesauce before the pie even hits the oven.
- Skip the Overmixing: The moment you start folding the flour and butter into a shaggy mess, you’ve lost the flaky texture. Cut the butter into cold chunks, work quickly, and stop mixing the second the dough clumps together. Overworking it guarantees a tough, dense crust—no one wants that.
- Use Two Spoons: Layering apples in a single pie dish leads to uneven cooking and soggy bottoms. Divide your sliced apples into two bowls, then alternate spoonfuls of Granny Smith and Honeycrisp in concentric circles. Start from the outer edge and work inward—this ensures even browning and a balanced sweet-tart bite in every forkful.
Essential equipment for this recipe
Pie Pan Essentials
A 9-inch deep-dish pie pan is your best friend for this recipe—I use Wilton ceramic pans for their even heat distribution. If you don’t have one, a 9-inch glass pie dish works too, but ceramic handles heat better and prevents soggy bottoms.
For extra insurance, place your pan on a baking sheet before sliding it into the oven to catch any drips. Avoid metal pans—they can overcook the crust edges. 🔥
Crust Tools
For homemade crusts, a rolling pin and pie crust roller (like the OXO Good Grips version) make rolling dough effortless. If you’re short on time, use a pastry cutter or even two forks to cut butter into flour by hand.
A pie bird (or aluminum foil slits) is essential for steam release—poke a few holes in the top crust before baking to prevent a soggy pie. 🍂
Prep Must-Haves
Keep a sharp chef’s knife and peeler handy for prepping apples—Granny Smiths are especially tough. A mandoline speeds up slicing if you’re making this for a crowd, but a steady hand works too.
For mixing the filling, a large mixing bowl and wooden spoon help distribute spices evenly. I also recommend a fine-mesh strainer to drain any excess juice if your apples are particularly juicy. ✨
Baking Gear
An oven thermometer is non-negotiable—home ovens often run hot or cold. I trust the Thermoworks Oven Thermometer to ensure your 375°F setting is accurate. For cooling, a wire rack prevents soggy bottoms by allowing air circulation.
If you’re short on racks, use a clean kitchen towel on a baking sheet as a substitute. A pie server makes slicing clean wedges easy, but a sharp knife works in a pinch. 💫
Optional Extras
For lattice tops, grab a pizza cutter or sharp knife to slice dough strips. A pastry brush helps paint egg wash on crusts for that golden finish. If you’re adding a crumble topping, a fork or spoon works for mixing butter and oats.
And for serving, a pie dish stand elevates your presentation—though a simple wooden board works just as well. 🍽️
Nutrition facts
Frequently asked questions
Can I use a store-bought crust instead of making one from scratch?
A high-quality store-bought crust works perfectly for this recipe. Choose an unbaked pie shell and press it into your 9-inch pan before adding the filling. Skip the extra butter in the crust instructions—your filling will provide enough moisture. For extra flakiness, brush the bottom crust with a little melted butter before filling.
What if my apples are too juicy and make the filling runny?
Don't worry—this happens with very ripe or watery apples. First, try adding 1 extra tablespoon of cornstarch to your filling. For extra insurance, spread a thin layer of crushed graham crackers or oats between the apples and bottom crust to absorb excess moisture. Bake as directed, then let the pie rest 30 minutes longer before slicing.
How can I make this pie ahead of time?
This recipe is perfect for prep! Assemble the pie (unbaked) and refrigerate for up to 24 hours before baking. For make-ahead serving, bake the pie, then cool completely. Store wrapped at room temperature for 2 days or refrigerate for up to 1 week. Reheat slices in a 350°F oven for 10 minutes with a splash of cream for extra richness.
Can I make a smaller or larger version of this pie?
Yes! For a 6-inch pie, halve all ingredients. For a 12-inch pie, increase by 50% but add 15 minutes to baking time. The key is maintaining the same thickness—about ⅛-inch for the crust and ¼-inch apple slices. Adjust oven racks if needed to prevent over-browning in larger pans.
What's the best way to reheat leftover pie?
Slice the pie and reheat individual portions in a 350°F oven for 8-10 minutes until warm through. For microwave reheating, cover with a damp paper towel and heat for 20-30 seconds at 50% power. The oven method keeps the crust crispy while the microwave makes the filling gooey—choose based on your preference!