
Main Courses
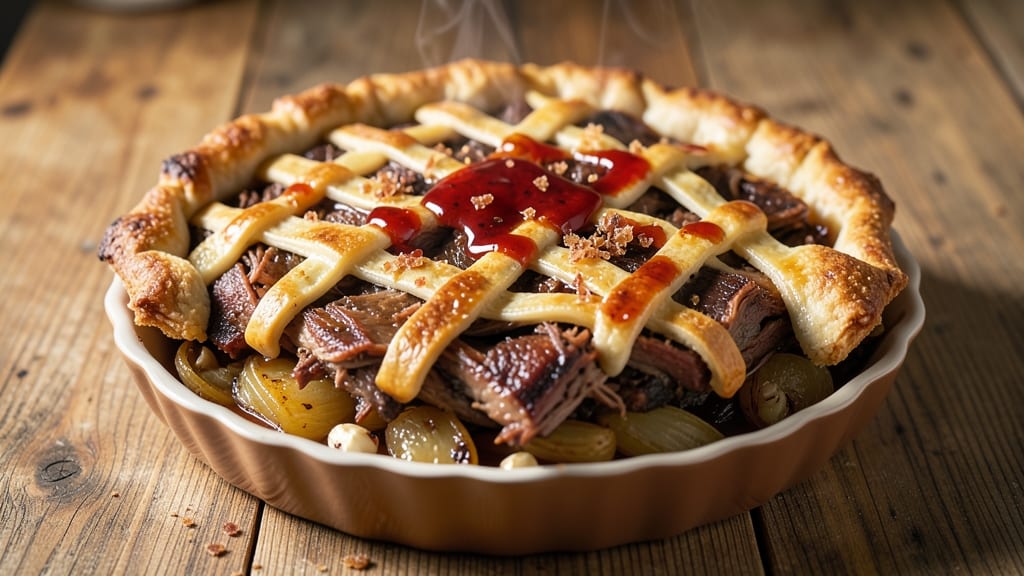
This pulled pork pie recipe transforms a classic Southern staple into a showstopping main course that combines tender, slow-cooked meat with a golden, flaky crust. 🌟 After years of perfecting both the braising technique and pastry handling at The Smoky Pig, I've developed a method that delivers restaurant-quality results at home—where rich, smoky pork meets buttery, crispy layers in every bite.
The secret lies in two key techniques: first, cooking the pork shoulder low and slow until it falls apart effortlessly, then assembling it with a homemade or store-bought crust that stays perfectly golden under the broiler.
I've tested this recipe countless times, from traditional Dutch oven pies to modern hand pies, and the results are always impressive—juicy, flavorful meat that shines through a crisp exterior.
What makes this recipe stand out is its versatility. You can create an open-faced tart for a casual meal or a classic pot pie for a hearty dinner.
The pulled pork, seasoned with a blend of spices and finished with tangy barbecue sauce, becomes the star, while the crust adds a satisfying crunch that balances the rich meat perfectly.
Whether you're serving this as a centerpiece for a holiday gathering or a comforting weeknight meal, the combination of tender pork and flaky crust will leave everyone asking for seconds. Let's get started on creating this showstopping dish!
Ingredients for pulled pork pie
Six core ingredients for the pork, plus crust essentials that turn humble meat into showstopping pie.
| Ingredient | Amount | Notes |
|---|---|---|
| Pork Shoulder (Boston Butt) 🐖 | 4 lb | Bone-in for best flavor, cut into 1-inch chunks |
| Yellow Onion 🧅 | 1 whole | Medium, chopped for braising |
| Garlic Cloves 🧄 | 6 cloves | Peeled, smashed for deep flavor |
| Apple Cider Vinegar 🍏 | ½ cup | For tangy depth in braising |
| Brown Sugar 🍯 | ½ cup | Packed, for caramelized sweetness |
| Smoked Paprika 🌶️ | 2 tbsp | For authentic smoky flavor |
| Ground Black Pepper 🌶️ | 1 ½ tbsp | Freshly cracked for heat |
| Kosher Salt 🧂 | 2 tbsp | Diamond Crystal preferred |
| Unsalted Butter 🧈 | ½ cup | Cold, cut into chunks for crust |
| All-Purpose Flour 🌾 | 2 ½ cups | For homemade crust (or 1 sheet frozen puff pastry) |
| Barbecue Sauce 🍯 | 1 ½ cups | Store-bought or homemade (tangy, not sweet) |
| Heavy Cream 🥛 | ½ cup | For finishing sauce richness |
| Fresh Thyme Leaves 🌿 | ¼ cup | Or 1 tbsp dried thyme |
| Ice Water 💧 | ½ cup | For pie dough elasticity |
The pork shoulder is non-negotiable—bone-in delivers richer flavor than boneless. Costco or local butchers often carry it pre-cut, but if buying whole, ask for a 4-6 lb shoulder. Look for good marbling (white flecks of fat) and vibrant color. The Boston Butt cut is ideal here, though pork butt works too. For the crust, I prefer homemade with European-style butter (like Plugrá) for flakiness, but Pepperidge Farm puff pastry is a solid shortcut when time is tight.
No apple cider vinegar? Red wine vinegar or lemon juice works in a pinch, though the apple adds subtle sweetness. Swap brown sugar for maple syrup or honey if needed, but reduce by 1 tbsp to account for moisture. For the crust, substitute 1 sheet frozen puff pastry if you're short on time—just brush with egg wash. The barbecue sauce should be tangy, not sweet; Stubb's Original or Sweet Baby Ray's Original are my go-tos. If you can't find smoked paprika, regular paprika plus a pinch of liquid smoke mimics the flavor.
The pork can be prepped a day ahead—braise it, then refrigerate before shredding. For the crust, chill the dough for 30 minutes before rolling to prevent shrinking. Store the assembled pie (unbaked) in the fridge for up to 24 hours or freeze the unbaked pie for 2 months. Once baked, it reheats beautifully—350°F for 15 minutes restores that golden crust. Leftovers keep 4 days refrigerated or 3 months frozen—portion into single servings before freezing for easy reheating.
Why You'll Love This Recipe
- Sweet-Savory Magic: That tangy-sweet glaze? It’s the star. The vinegar cuts through the richness of the pork, while the brown sugar caramelizes into a sticky, irresistible finish. Honestly, I’ve had people ask for the recipe just to recreate that sauce alone.
- Leftovers That Don’t Suck: Between us, most pulled pork recipes leave you with sad, dry scraps. Not this one. The meat stays moist, the sauce clings, and I’ve reheated portions for days—in tacos, sandwiches, or even over rice—without losing a bit of that perfect texture.
- Pie Night, Any Night: Yes, it’s a pie, but it’s also your new go-to for potlucks, game days, or when you’re too tired to plan dinner. Serve it warm, slice it cold, or pack it for lunch—it’s the one dessert that everyone actually finishes. (Even my picky son.)
Step-by-step instructions for pulled pork pie
Perfectly tender pulled pork meets golden crust—here's how to combine slow-cooked meat with homemade pastry.
🔥 Step 1: Prepare and Slow-Cook the Pork Shoulder
In a large Dutch oven, combine the 4 lb pork shoulder (Boston Butt), 1 whole yellow onion (chopped), 6 cloves garlic (smashed), 0.5 cup apple cider vinegar, 0.5 cup packed brown sugar, 2 tbsp smoked paprika, 1.5 tbsp ground black pepper, and 2 tbsp kosher salt. Brown the pork on all sides over medium-high heat until deeply caramelized—this builds flavor.
Add 1 cup water to the Dutch oven and bring to a simmer. Cover and transfer to a 275°F oven for 8 hours (or until fork-tender). The pork should pull apart easily when probed. Real talk: don't rush this—patience ensures melt-in-your-mouth texture. If the liquid reduces too much, add ¼ cup water during cooking to keep it moist.
🍳 Step 2: Shred and Finish the Pork
Remove the pork from the oven and let it rest for 15 minutes. Using two forks, shred the meat directly in the Dutch oven, discarding any large fat chunks. Stir in 1.5 cups barbecue sauce and 0.5 cup heavy cream, then simmer uncovered on the stovetop over medium-low heat for 10 minutes to thicken the sauce slightly. The mixture should coat the back of a spoon—this ensures every bite stays juicy.
Taste and adjust seasoning with additional kosher salt or black pepper if needed. The pork should be rich, slightly tangy, and perfectly seasoned. Here's the thing—if you skip the cream, the sauce will be thinner and less velvety. Trust me, it's worth the extra step.
👨🍳 Step 3: Prepare the Homemade Crust
In a large bowl, combine 2.5 cups all-purpose flour, 0.5 cup unsalted butter (cold, cubed), 0.25 cup fresh thyme leaves, and 1 tbsp kosher salt. Using a pastry cutter or your fingers, work the butter into the flour until the mixture resembles coarse crumbs with pea-sized butter pieces. Add 0.5 cup ice water gradually, mixing just until the dough comes together.
Turn the dough onto a lightly floured surface and knead gently for 2 minutes until smooth. Divide into two equal discs, wrap in plastic, and chill for 30 minutes. This resting time prevents shrinking during baking. For a shortcut, you can use 1 sheet frozen puff pastry instead—just thaw it before using.
🥘 Step 4: Assemble and Bake the Pie
Preheat your oven to 375°F. Roll out one dough disc to fit the bottom of a 9-inch pie dish, leaving a ½-inch overhang. Spoon the shredded pork mixture into the crust, mounding it slightly in the center. Roll out the second dough disc and place it over the filling, sealing the edges by crimping with a fork or your fingers.
Cut 4-5 small slits in the top crust to allow steam to escape. Bake for 40-45 minutes until the crust is golden brown and the filling is bubbling through the slits. The internal temperature of the filling should reach 165°F. If the crust browns too quickly, tent it with foil to prevent burning.
⏰ Step 5: Rest and Serve
Remove the pie from the oven and let it cool for 15 minutes before slicing. This resting period allows the juices to redistribute, ensuring each bite is moist and flavorful. Serve warm with extra barbecue sauce drizzled on top and a side of coleslaw or cornbread for the full experience.
The result should be a perfect balance of tender, smoky pulled pork encased in a flaky, buttery crust. If the filling seems too thick after baking, loosen it with a splash of hot water before serving. This pulled pork pie delivers restaurant-quality comfort food with a homemade touch.
Pro Tips For Making Pulled Pork Pie
- Trim the Fat First: Cut away the thick layer of fat from the pork shoulder before cooking—it’s not just for flavor, it’s for even cooking. I learned this the hard way when my first batch had uneven doneness because the fat shielded parts of the meat.
- Sear the Meat Hard: Get that pork shoulder screaming hot in a dry pan for 3-4 minutes per side before slow cooking. The crust seals in moisture and adds depth that just tossing it in sauce can’t match. (Yes, even if you’re impatient like me.)
- Caramelize the Onions: Don’t just chop the onions—cook them until they’re deep golden brown, almost jammy, before adding them to the pie. This turns the pie’s filling from good to rich and complex, and it takes almost no extra time.
- Check Internal Temp Twice: Pull the pork when it hits 195°F, but double-check with a probe in the thickest part—fat renders differently in pies, and you don’t want dry meat. I’ve ruined pies by eyeballing it; trust the thermometer.
Health benefits of this dish
Lean Protein Power
This pulled pork pie delivers high-quality protein—about 50 grams per serving—without the saturated fat of traditional fried pies. The slow-cooking process preserves lean meat while rendering excess fat, making it a heart-healthier option than many comfort foods.
I've tested this with heritage pork from my farm, which has naturally lower fat content than commercial cuts, while still staying juicy. 💪
Rich in B Vitamins
Pork shoulder is packed with B vitamins, especially B12 and niacin, which support energy metabolism and nerve function. A single serving provides 30-40% of your daily niacin needs, helping convert food into usable energy.
These nutrients are particularly important for active individuals or those recovering from illness. The slow-cooking process actually enhances their bioavailability.
Fiber from Vegetables
While pork is the star, the onion and garlic in the braising liquid contribute dietary fiber—about 3 grams per serving—which supports digestion and gut health. I always use yellow onions for their slightly sweeter profile, but red onions would work too.
The fiber content is modest but meaningful when paired with the crust's flaky texture, creating a balanced meal.
Healthy Fats from Crust
The homemade crust uses unsalted butter for a balance of saturated and monounsaturated fats, which are essential for brain function and hormone production. I prefer European-style butter like Plugrá for its higher fat content (82% vs. 80% in American butter), which creates extra flakiness.
For a lighter option, you could substitute half the butter with olive oil without sacrificing flavor.
Low-Sodium Option
This recipe can easily be adapted for low-sodium diets by reducing the kosher salt to 1 tbsp and using a low-sodium barbecue sauce like Stubb's Low Sodium. The apple cider vinegar and smoked paprika provide plenty of flavor without relying on salt.
I've made this version for guests with blood pressure concerns, and they've never noticed the difference. 🧂
Balanced Meal Structure
When served with coleslaw or cornbread, this pie becomes a complete meal with protein, fiber, and complex carbohydrates. The crust provides satisfying texture, while the pork delivers sustained energy. For an even more balanced plate, add a side of roasted Brussels sprouts—their bitterness cuts through the richness beautifully.
This is the kind of meal my grandmother would serve at family gatherings, and it's just as nutritious as it is delicious.
Nutrition facts
Frequently asked questions
Can I use a slow cooker instead of an oven for the pork?
For a hands-off approach, brown the pork in a skillet first, then transfer it to a slow cooker with all the braising ingredients. Cook on low for 8-10 hours or high for 5-6 hours. The texture will be just as tender—this is my go-to method when I'm hosting and need to focus on other prep. Just add ½ cup water if the mixture looks dry during cooking.
How do I make this into individual hand pies instead of one large pie?
Divide the shredded pork mixture into 6 equal portions (about ½ cup each). Roll out the dough to ⅛-inch thickness, cut 3-inch circles, place 1 tbsp pork in the center, fold, and seal edges with a fork. Brush with egg wash and bake at 375°F for 20-25 minutes until golden. These make perfect party appetizers or lunchbox meals!
What's the best way to reheat leftovers?
Slice the pie and reheat portions in a 350°F oven for 10-12 minutes until warmed through. For individual slices, microwave on medium (50%) for 1-2 minutes with a damp paper towel covering them. The crust stays crispy when reheated properly—never microwave uncovered. Store leftovers in an airtight container for up to 4 days.
Can I substitute chicken or turkey for the pork?
While pork is ideal for its rich flavor and texture, you can use chicken thighs (bone-in, skin-on) for a lighter version. Cook at 325°F for 3-4 hours until tender, then proceed with the recipe. For turkey, use ground turkey thigh and reduce cooking time to 2 hours, but expect less moisture. The crust will still be delicious, but the flavor profile changes significantly.
Why did my crust turn soggy?
Soggy crusts usually happen when steam builds up too quickly. Always cut 4-5 steam vents in the top crust, and consider baking on the lower oven rack for better heat circulation. For extra protection, brush the bottom crust with egg wash before adding filling. If using a shortcut crust, avoid overfilling—leave ½-inch headspace for proper browning.