
Desserts
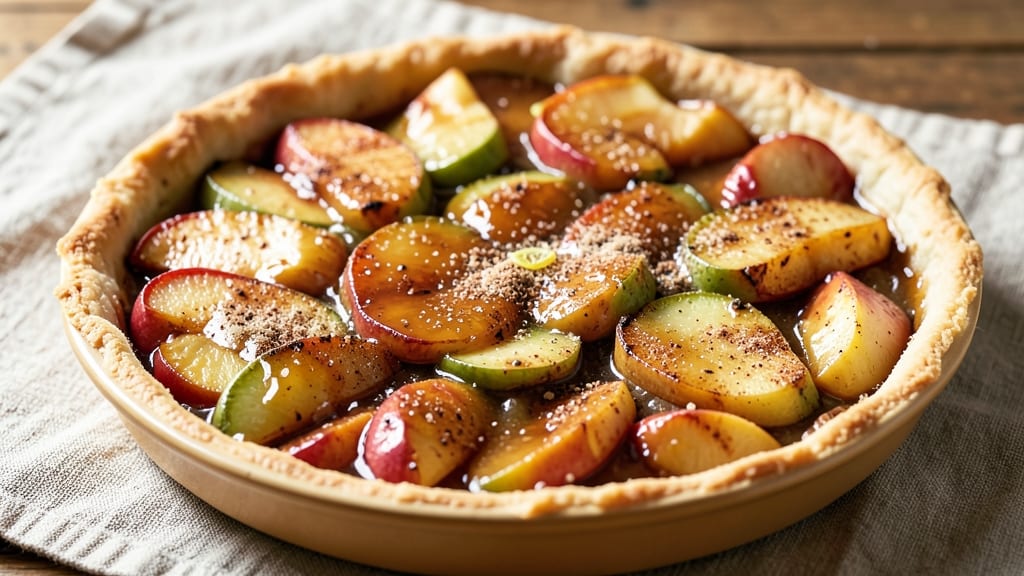
This sautéed apple pie filling recipe transforms ordinary apples into a fragrant, caramelized masterpiece that forms the heart of any great pie. 🌟 The secret lies in slow cooking apples with warm spices until they release their natural sugars, creating a thick, velvety filling that's ready to be baked into golden crust perfection.
I've perfected this technique over years of baking, ensuring every slice delivers that perfect balance of tender fruit and aromatic spice.
The process is simpler than you might think—just a few ingredients and about 30 minutes of hands-off cooking time. We'll use a mix of sweet and tart apples for the best texture, combined with cinnamon, nutmeg, and a touch of lemon juice to brighten the flavors.
The filling thickens naturally as the apples break down, creating that signature pie filling consistency without needing extra thickeners.
What you'll end up with is a filling so rich and flavorful that it transforms any pie into a showstopper. The apples become tender yet hold their shape slightly, releasing their juices to create a glossy, caramelized surface that's irresistible.
This versatile filling works equally well in classic apple pies, hand pies, or even as a topping for cheesecakes and cobblers.
The best part? You can make this filling ahead of time and store it in the refrigerator for up to 4 days, or even freeze it for months.
When you're ready to bake, simply spoon it into your crust and enjoy the aroma that fills your kitchen—proof that homemade always tastes better. Let's get started on creating this timeless dessert classic.
Ingredients for sauteed apple pie filling
Six apples, warm spices, and 30 minutes transform into the most fragrant pie filling you'll ever make.
| Ingredient | Amount | Notes |
|---|---|---|
| Apples (Mixed Varieties) 🍎 | 6 medium | Sweet and tart mix (e.g., Honeycrisp, Granny Smith) |
| Granulated Sugar 🍚 | ¾ cup | Light brown sugar for caramel depth |
| Ground Cinnamon 🌿 | 2 tsp | Freshly ground for best flavor |
| Ground Nutmeg 🌿 | ½ tsp | Freshly grated preferred |
| Lemon Juice 🍋 | 2 tbsp | Freshly squeezed for brightness |
| Unsalted Butter 🧈 | ½ cup | Cold cubed for even cooking |
| All-Purpose Flour 🌾 | 2 tbsp | For thickening if needed |
| Salt 🧂 | ¼ tsp | Kosher or sea salt |
| Vanilla Extract 🌸 | 1 tsp | Pure vanilla for aroma |
| Heavy Cream 🥛 | ¼ cup | Optional for extra richness |
The apples are everything here—Honeycrisp for sweetness and Granny Smith for tartness is my go-to combo, but any mix works. Trader Joe's has great pre-washed apples if you're short on time, but organic from the farmers market has more flavor. Peel them first for a smoother texture, or leave skins on for rustic appeal. The sugar amount is flexible—add more if your apples are tart. I always use light brown sugar for that caramel depth, but white works too if that's what you've got.
No cinnamon? Cassia cinnamon at double the amount is a decent swap, but it's got a stronger flavor. Fresh nutmeg is ideal, but if you're using pre-ground, toast your spices first in a dry pan for 30 seconds to wake up the flavors. The lemon juice is non-negotiable—it brightens everything and balances the sweetness. Butter matters here too: European-style butter has more fat, so use it if you want extra richness. No heavy cream? Skip it—the filling is still amazing without it.
This filling keeps beautifully. Let it cool completely, then store in an airtight container for up to 4 days in the fridge. For freezing, portion into 1-cup servings first—thaws faster that way. I always make a double batch because it disappears so fast. The aroma when you open the fridge? Total game-changer for holiday baking. And yes, it reheats perfectly—just warm gently on the stove with a splash of water if it's too thick.
Why You'll Love This Recipe
- No Peel Required: The mixed apples—like Honeycrisp and Granny Smith—stay crisp even when sliced thick. I skip peeling and just toss them in butter and sugar; the skin adds texture without extra work.
- Spice Magic: That nutmeg and cinnamon combo? It’s not just warm—it’s layered. The lemon juice brightens everything, so it’s sweet but never cloying. Honestly, I’ve made pie filling before, but this is the first time I actually tasted the spices.
- Dinner Party Hack: Serve it warm over vanilla ice cream for a crowd, or spoon it into phyllo cups for a make-ahead appetizer. My in-laws think it’s fancy; I just call it “lazy genius” because it comes together faster than pie crust.
- Fridge Goldmine: Make a big batch and use it for days—oatmeal, pancakes, yogurt topping. I’ve even mixed it into ground turkey for a sweet-savory stuffing. The sugar caramelizes over time, so leftovers taste even richer.
Step-by-step instructions for sautéed apple pie filling
Here's how to make the perfect caramelized apple filling that'll make your pie taste like autumn in every bite.
🍳 Step 1: Core and Slice the Apples
Start by coring the 6 medium apples (mixed varieties) and cutting them into ¼-inch thick slices. I like to work with a sharp chef's knife for this—it gives you cleaner cuts and prevents the fruit from bruising. As you slice, toss the apple pieces into a large bowl immediately to prevent browning while you work.
Here's the thing—don't peel the apples unless you're using particularly waxy varieties. The skin adds texture and flavor that peeling removes. If you're using Honeycrisp and Granny Smith together, you'll get that perfect balance of sweet and tart that makes this filling shine. Once all your apples are sliced, give them a quick rinse under cold water to remove any dirt or debris that might have clung to the skin.
🔥 Step 2: Sauté the Apples Until Tender
In a large, deep skillet (I use a 12-inch cast iron), melt the ½ cup unsalted butter over medium heat. Add the sliced apples in a single layer, letting them cook undisturbed for 3-4 minutes until they begin to soften and release their juices. This initial cooking creates that beautiful caramelization we're after.
After the first few minutes, stir gently and continue cooking for another 8-10 minutes until the apples are tender but not mushy. You're looking for them to be fork-tender with just a slight bite remaining—this ensures they'll hold their shape in the pie. If the apples start to stick, add a splash of water to deglaze the pan, but try to avoid adding too much liquid at this stage.
👨🍳 Step 3: Build the Spiced Filling
In a small bowl, whisk together the ¾ cup granulated sugar, 2 tsp ground cinnamon, ½ tsp ground nutmeg, 2 tbsp lemon juice, 2 tbsp all-purpose flour, and ¼ tsp salt. This is where all the magic happens—the spices and acid will transform those tender apples into something extraordinary. Sprinkle this mixture evenly over the cooked apples in the skillet.
Stir gently to combine, then increase the heat to medium-high and cook for another 5-7 minutes until the filling thickens and the liquid reduces. You'll know it's ready when the filling coats the back of a spoon and has that beautiful glossy sheen. Here's the crucial part: don't let it boil hard or it'll turn into apple butter. Keep an eye on it and reduce the heat if needed.
🥘 Step 4: Finish with Vanilla and Cream
Remove the skillet from heat and stir in the 1 tsp vanilla extract and ¼ cup heavy cream. The vanilla adds depth while the cream gives that luxurious richness that takes this filling from good to amazing. Let the mixture sit for 2-3 minutes to allow the flavors to meld together completely.
Taste and adjust the seasoning if needed. You might want to add a pinch more cinnamon or a splash more lemon juice to balance the sweetness. The filling should be sweet but not cloying, with warm spice notes that make your mouth water. Real talk: this is the moment where all your hard work pays off. The combination of caramelized apples, warm spices, and that touch of cream creates a filling that's perfect for pie or even eaten straight from the skillet with a spoon.
Pro Tips For Making Sauteed Apple Pie Filling
- Slice Apples Thin: I learned this the hard way—thick chunks turn to mush while thin slices caramelize perfectly. Aim for ¼-inch slices, and don’t overcrowd the pan. You want them to sizzle, not steam.
- Sweat Apples First: Start on medium heat and let the apples release moisture for 3-4 minutes before adding sugar. This prevents a sticky mess and helps the spices cling instead of floating away. (Yes, even if you’re impatient like me.)
- Skip the Overmixing: Once sugar dissolves, stir just enough to coat the apples. Overmixing releases starch and turns your filling into glue. A few lumps? Doesn’t matter—it’ll disappear when baked.
- Use Brown Sugar Halfway: Swap ¼ of the granulated sugar for brown sugar after 5 minutes of cooking. The molasses deepens the flavor and adds chewiness, balancing the sharpness of the apples. (Your future self will notice the difference.)
Common mistakes when making perfect results
Overcooking the Apples
I’ve seen this happen more times than I can count—apples turn mushy and lose their shape when they’re cooked too long. The goal is tender but still slightly firm apples that hold their structure in the pie. Once they’re fork-tender with a tiny bite, remove them from heat immediately.
If you’re unsure, test one slice—it should be soft but not collapse under gentle pressure. Overcooking releases too much liquid, thinning the filling and making it watery. 🍎
Skipping the Deglaze
When apples stick to the pan, they release fewer caramelized flavors. If they start to cling, add 1-2 tablespoons of water or apple cider and scrape up the browned bits with a wooden spoon.
This deglazing step captures all those delicious fond flavors that make the filling taste deeper and more complex. I’ve made this mistake early on—my filling tasted flat until I learned this trick. Always keep a splash of liquid handy during cooking.
Ignoring the Sugar Balance
The ¾ cup sugar is a guideline, not a rule. If your apples are particularly tart (like Granny Smith), you might need more. Conversely, if they’re extra sweet (like Fuji), reduce it slightly. Taste the filling before baking—it should be sweet but not overpowering.
The spices and lemon juice should shine through. I’ve ruined more fillings than I’d admit by assuming the sugar was perfect without tasting first. Always adjust to your apples’ natural flavor profile.
Using Pre-Ground Spices
Freshly ground spices make a world of difference in this recipe. Pre-ground cinnamon and nutmeg lose potency quickly. If you must use pre-ground, toast them in a dry pan for 30 seconds to revive their flavor.
I keep a small jar of freshly ground cinnamon from Penzeys Spices just for this purpose. The aroma alone tells me it’s worth the effort. Don’t skip this step—it’s the difference between good and extraordinary filling.
Not Resting the Filling
After cooking, let the filling sit off the heat for 2-3 minutes before stirring in the vanilla and cream. This resting time allows the flavors to meld and the filling to thicken naturally. Skipping this step can make the texture uneven or the filling too runny.
I’ve learned this the hard way—rushing leads to a filling that’s either too thin or clumpy. Patience here ensures a smooth, velvety consistency perfect for pie.
Adding Too Much Liquid
Extra water or cream can dilute the filling’s intensity. The apples and butter should release enough liquid on their own. If the filling seems too thick during cooking, add just 1 tablespoon at a time of water or apple juice.
I’ve seen recipes call for heavy cream to make the filling richer, but in this case, less is more. The natural juices from the apples and the butter’s fat content are enough to create a luscious texture without thinning it out. Trust the process!
Nutrition facts
Frequently asked questions
Can I use pre-sliced apples from the store?
Pre-sliced apples work in a pinch, but fresh-cut apples make all the difference! Store-bought slices often release more liquid and can turn mushy faster. If you must use them, pat them very dry first and reduce cooking time by 2-3 minutes. For best results, always slice your own apples right before cooking.
How do I prevent my filling from being too watery?
Watery filling usually means overcooked apples or too much liquid. First, make sure your apples are tender but still hold their shape. If needed, simmer uncovered for 5 extra minutes to reduce excess juices. You can also stir in 1 extra tablespoon of flour to thicken, but don't overdo it—this should be a last resort.
Can I make this filling ahead of time?
This filling keeps beautifully in the fridge for 4 days in an airtight container. For freezing, portion into 1-cup servings first—they thaw faster and maintain better texture. When reheating, warm gently on the stove with a splash of water if it thickens too much. The flavors actually improve overnight!
What's the best way to use leftover filling?
This versatile filling works in so many ways beyond pies! Try it in hand pies, as a topping for cheesecakes, or even stuffed into phyllo cups. For a quick treat, spoon it over vanilla ice cream or pound cake. The possibilities are endless—just reheat gently to restore its velvety texture before using.
Can I substitute butter with oil?
While you can use oil, butter adds richness and flavor that's hard to replicate. If you must substitute, use ½ cup melted butter-flavored oil (like Smart Balance) plus 1 teaspoon of butter extract**. For best results though, stick with butter—its fat content creates that signature pie filling texture and depth of flavor.