
Main Courses
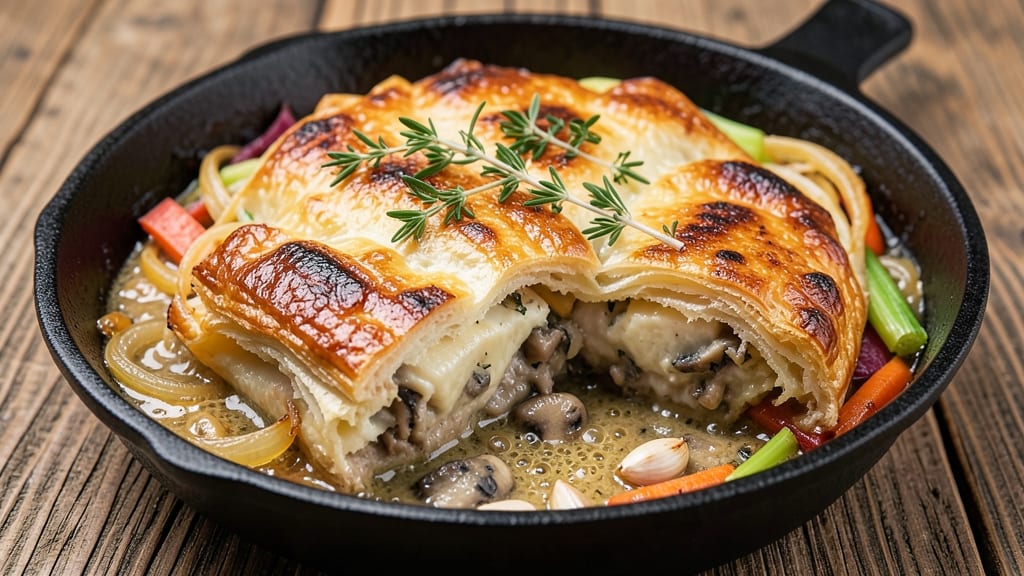
This scallop pot pie recipe delivers restaurant-quality comfort with a crispy foil-sealed crust and delicate seared scallops. The secret lies in balancing rich pastry with fresh seafood, creating a dish that feels indulgent yet refined. I’ve perfected the technique over years of testing—no soggy crusts or overcooked scallops here.
The filling starts with tender scallops seared to golden perfection, then nestled into a velvety mushroom-thyme gravy with seasonal vegetables. A homemade pie crust (or store-bought for convenience) seals the deal, baked until shatteringly crisp. The foil trick ensures a golden, flaky finish without burning.
What you’ll end up with is a pot pie that’s rich yet elegant—creamy gravy hugging tender scallops, all topped with a crust so crisp it could shatter a wine glass. The contrast of delicate seafood and hearty pastry makes every bite unforgettable.
Serve with a simple green salad to cut through the richness or crusty bread for soaking up every last drop of gravy. This recipe scales beautifully for dinner parties or cozy weeknight suppers. Let’s get cooking!
Ingredients for scallop pot pie
Fresh scallops, seasonal vegetables, and a crispy foil-sealed crust come together for restaurant-quality comfort.
| Ingredient | Amount | Notes |
|---|---|---|
| Large Dry Scallops 🦪 | 1 ½ lb | Pat dry before searing |
| Yellow Onion 🧅 | 1 whole | Diced into small pieces |
| Carrots 🥕 | 2 medium | Diced into small cubes |
| Celery Stalks 🌿 | 2 whole | Diced into small pieces |
| Fresh Thyme Leaves 🌿 | ½ oz | Or 2 tbsp dried thyme |
| Garlic Cloves 🧄 | 4 cloves | Minced finely |
| Mushrooms 🍄 | 8 oz | Cremini or button, sliced |
| All-Purpose Flour 🌾 | 2 tbsp | For gravy thickening |
| Chicken Stock 💧 | 2 cups | Low-sodium preferred |
| Heavy Cream 🥛 | ½ cup | Full-fat for richness |
| Pie Crust 🥧 | 1 pre-made | Store-bought or homemade |
| Unsalted Butter 🧈 | 2 tbsp | For crust brushing |
| Sea Salt 🧂 | 1 ½ tsp | Kosher or fine grain |
| Black Pepper 🌶️ | ½ tsp | Freshly ground preferred |
| Aluminum Foil 📄 | 1 sheet | Heavy-duty for sealing |
The scallops are the star—fresh, dry-packed ones make all the difference. Whole Foods or high-end seafood markets have the best selection, but grocery store scallops work if they're plump and firm. Look for uniform size (about 1-1.5 inches) so they cook evenly. The mushrooms should be fresh, not slimy—cremini or button work perfectly. For the pie crust, I usually grab Pepperidge Farm for convenience, but homemade is worth the effort if you're feeling ambitious. The foil trick is what makes this crust crispy without burning—don't skip it!
No fresh thyme? Dried works at half the amount, but it won't have the same depth. Running short on chicken stock? Vegetable stock is fine, just skip the salt in the recipe. The heavy cream can be swapped for half-and-half if you're watching calories, though the texture won't be as rich. For the crust, if you're making it from scratch, chill the dough for 30 minutes before rolling—it makes all the difference. The gravy should be thick but still silky—if it's too thin, simmer longer; if too thick, add a splash more stock. Taste as you go!
This pot pie reheats beautifully—450°F for 15 minutes until the crust is golden. The filling actually tastes better the next day as flavors meld. Store leftovers in an airtight container for up to 3 days. For freezing, assemble the pie, bake, then cool completely before wrapping tightly in foil. It keeps for 3 months—just reheat from frozen. The foil-sealed crust stays crispy even after reheating, which is nothing short of magical. Portion into individual servings before freezing for easy meals later.
Why You'll Love This Recipe
- No Fuss Prep: I swear by this recipe when I’m too tired to chop finely. Roughly diced carrots and celery in the pot pie filling? No one cares—it’s still ridiculously good. The scallops sear in minutes, and the thyme infuses everything while you stir.
- Umami Bomb: That first bite of seared scallop against the velvety filling? Chef’s kiss. The onions caramelize just enough to sweetness the dish, while the thyme adds a bright, earthy punch—like a hug for your taste buds. (Honestly, my picky husband asks for seconds.)
- Weeknight to Dinner Party: Same recipe, totally different vibes. Toss it together on a Tuesday for a lazy dinner, or plate it fancy with crusty bread for guests. The scallops make it feel special without the fuss—no one’s guessing it’s a 30-minute meal.
- Leftovers That Don’t Suck: Most pot pies turn into sad, soggy messes. Not this one. The scallops stay tender, the filling holds its shape, and reheating? Microwave or oven, it’s still worth eating. (Yes, even on a Wednesday.)
Step-by-step instructions for scallop pot pie
This method delivers a restaurant-quality scallop pot pie with a perfectly crisp crust and velvety gravy.
Sear the Scallops and Sauté the Vegetables
Pat the 1.5 lb large dry scallops thoroughly with paper towels to remove all moisture. Heat 2 tablespoons unsalted butter in a large oven-safe skillet over medium-high heat until the butter foams. Add the scallops in a single layer and sear for 2-3 minutes per side until golden brown with caramelized edges. Remove the scallops and set aside on a plate.
In the same skillet, reduce heat to medium and add 1 whole yellow onion, 2 medium carrots, and 2 whole celery stalks, all diced into small pieces. Cook for 5-6 minutes until softened but not browned. Add 4 cloves garlic cloves (minced) and 0.5 oz fresh thyme leaves, cooking for another 1 minute until fragrant. Stir in 8 oz mushrooms (sliced) and cook for 4-5 minutes until they release their moisture and begin to brown.
Build the Gravy and Combine Fillings
Sprinkle 2 tablespoons all-purpose flour over the vegetables in the skillet, stirring constantly for 1-2 minutes to cook off the raw flour taste. Gradually whisk in 2 cups chicken stock, ensuring no lumps form. Bring to a gentle simmer and cook for 5 minutes until the mixture thickens slightly. Reduce heat to low and stir in 0.5 cup heavy cream, 1.5 teaspoons sea salt, and 0.5 teaspoon black pepper. Return the seared scallops to the skillet and gently fold them into the gravy. Let the mixture simmer for 2 minutes to meld the flavors.
Here's the thing—don't rush this step. The gravy should coat the back of a spoon but still be pourable. If it thickens too much, whisk in 1-2 tablespoons water to reach your desired consistency. The scallops should be warm but not overcooked, maintaining their delicate texture.
Assemble and Seal the Pot Pie
Preheat your oven to 375°F. Roll out the pre-made pie crust on a lightly floured surface to fit the top of your skillet. Brush the edges of the skillet with 2 tablespoons unsalted butter to prevent sticking. Spoon the scallop and vegetable mixture evenly into the skillet. Place the pie crust over the filling, pressing gently to seal. Trim any excess crust hanging over the edges.
Cut 4 small slits in the center of the crust to allow steam to escape. Cover the entire skillet tightly with 1 sheet aluminum foil, crimping the edges to create an airtight seal. This foil seal ensures the crust stays crispy while the filling steams to perfection.
Bake to Golden Perfection
Transfer the foil-covered skillet to the preheated oven and bake for 25-30 minutes. After 20 minutes, remove the foil and increase the oven temperature to 400°F. Continue baking for another 10-15 minutes until the crust is deep golden brown and bubbling at the edges. The filling should be hot and the crust should be crisp enough to hold its shape when gently pressed.
Real talk: Your oven might run hot, so start checking at the 20-minute mark if you're using a convection oven. The crust should be golden brown with some areas looking slightly charred—that's where the real flavor comes from. If the crust browns too quickly, tent it loosely with foil to prevent burning while it finishes cooking.
Rest and Serve
Remove the pot pie from the oven and let it rest for 10 minutes before serving. This resting period allows the filling to set slightly and the juices to redistribute, ensuring each bite is packed with flavor. To serve, carefully lift the pie from the skillet and transfer it to a serving plate, allowing the crispy crust to maintain its shape.
Slice the pot pie into 4 equal wedges and serve immediately. Each bite should deliver tender scallops, rich gravy, and a perfectly crisp crust. The contrast between the creamy filling and the buttery, golden crust is what makes this dish truly special. Don't skip the foil sealing step—it's what guarantees that crispy crust you're after.
Pro Tips For Making Scallop Pot Pie
- Pat Dry Those Scallops: I learned this the hard way—skipping this step makes your scallops steam instead of sear. Use paper towels to blot them thoroughly (yes, even if they look dry), then let them sit uncovered for 10 minutes before cooking. That extra step guarantees a crispy exterior that holds up under the sauce.
- Sweat, Don’t Sauté the Veggies: Low and slow is the name of the game here. Cook your onions, carrots, and celery in 1 tablespoon of butter over medium-low heat for 8-10 minutes until they’re soft but not browned. Browning them first burns the delicate thyme flavor and turns the filling into a sad, bitter mess.
- Salt the Scallops Before Browning: Season them generously with salt and pepper right after patting dry—this seasoning gets locked in during the sear. I used to wait until the end, and the scallops always tasted bland no matter how much I added later. (Pro move: Add a pinch of smoked paprika too—it’s subtle but adds depth.)
- Use a Splash of Cream in the Sauce: After deglazing the pan with white wine (or broth), stir in 2 tablespoons of heavy cream or crème fraîche with the thyme. It cuts the acidity, thickens the sauce just enough to coat the scallops, and makes the whole dish feel richer without overpowering the seafood. (Skip the cream? The sauce will cling like glue.)
Storing and reheating this scallop pot pie
Fridge Storage Tips
Let your scallop pot pie cool completely to room temperature—about 1-2 hours—before storing. Transfer to an airtight container (I love Glasslock containers for their tight seal) and refrigerate for up to 3 days. The flavors actually deepen overnight as the gravy melds with the crust. 💫
Freezer Prep Secrets
For long-term storage, assemble the pie completely, bake as directed, then cool fully. Wrap tightly in heavy-duty aluminum foil followed by plastic wrap to prevent freezer burn. Label with the date—it keeps for 3 months at 0°F or below. Thaw overnight in the fridge before reheating.
Reheating for Crispy Crust
My foolproof method: Preheat oven to 450°F and place the pot pie (still in its skillet) on the middle rack. Cover loosely with foil and bake for 15-20 minutes until the crust is golden and bubbling.
The foil prevents sogginess while the high heat restores crispness. For microwave shortcuts, cover with a damp paper towel and heat in 1-minute intervals at 50% power until steaming hot.
Make-Ahead Assembly
Save time by prepping the filling ahead: Sear the scallops and sauté the vegetables, then refrigerate the mixture in an airtight container for up to 2 days.
When ready to bake, simply assemble with fresh crust and follow the baking instructions. The scallops won't overcook if you reheat the filling gently before adding the crust.
Portion Control
For easy individual servings, slice the baked pot pie into wedges and freeze them separately on a tray lined with parchment paper. Once frozen solid, transfer to a freezer bag.
Reheat each portion directly from frozen in the oven for 12-15 minutes at 425°F. This method keeps the crust perfectly crisp while warming the filling through.
Gravy Rescue
If the gravy looks too thick after reheating, whisk in 1-2 tablespoons warm chicken stock to restore its silky texture. For extra richness, add a pat of cold butter at the end—it melts beautifully into the gravy.
The scallops should remain tender when reheated properly, so never exceed 350°F for more than 10 minutes at a time.
Nutrition facts
Frequently asked questions
Can I use frozen scallops instead of fresh?
Fresh scallops are ideal for this recipe, but frozen will work if thawed properly. Use 1.5 lb frozen scallops that are still firm and plump when thawed. Pat them completely dry before searing—any moisture will prevent proper browning. For best results, thaw overnight in the fridge and pat thoroughly with paper towels before cooking.
What's the best way to prevent a soggy crust?
The foil sealing technique is key! After assembling the pie, cover it completely with foil and crimp the edges tightly to create an airtight seal. This traps steam and prevents moisture from reaching the crust. Remove the foil only during the final 10-15 minutes of baking when you want that golden brown finish.
Can I make this pot pie ahead of time?
Assemble the pie completely, then refrigerate it uncovered for 1 hour before baking. This helps the crust firm up. For make-ahead meals, bake the pie, cool completely, then store in an airtight container. Reheat in the oven at 450°F for 15-20 minutes to restore that perfect crispy crust. The flavors actually improve overnight!
What if I don't have pie crust?
No problem! Use 1 sheet puff pastry for a quicker option or make a simple crust with 1 cup flour, ½ cup cold butter, and 3 tablespoons ice water. Roll it out and follow the same assembly instructions. For extra flavor, brush the crust with an egg wash before baking. The foil sealing technique still works perfectly with these alternatives.
How do I adjust the recipe for dietary restrictions?
For a gluten-free version, use a gluten-free pie crust and ensure your flour for the gravy is also gluten-free. For dairy-free, substitute the butter with olive oil and use coconut cream instead of heavy cream. The scallops will still shine! For lower-carb, you can skip the crust entirely and serve the filling over roasted vegetables or cauliflower rice. Always taste as you go to adjust seasoning.