
Desserts
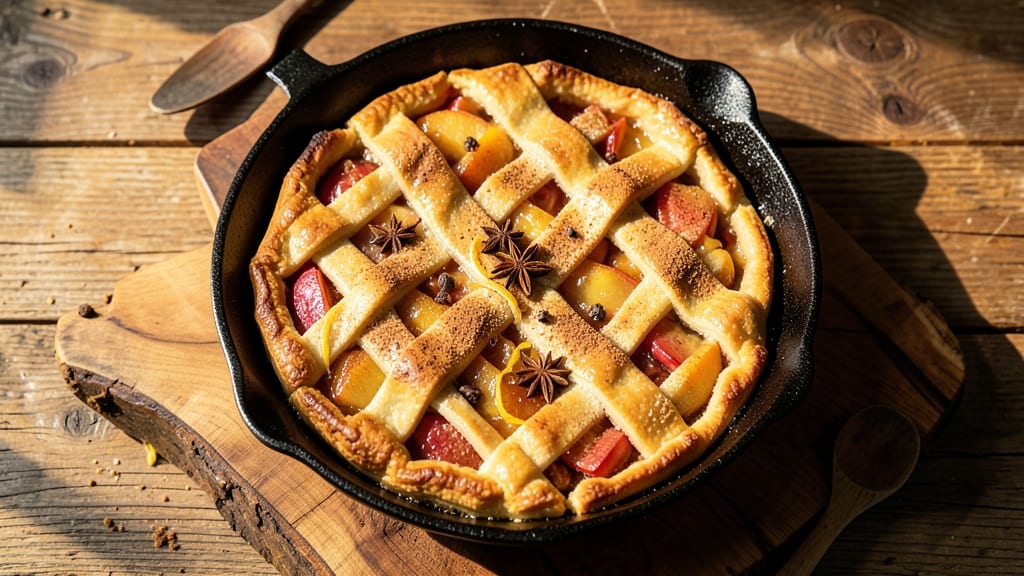
This sizzling apple pie recipe delivers bakery-style perfection with a golden, caramelized topping that crackles like autumn leaves underfoot. The secret lies in a pre-baked crust topped with a sugar-butter mixture that melts into a glossy, amber finish—no lattice crust required.
I perfected this technique after years of testing, and the difference is night-and-day compared to traditional pies.
The filling combines tender apples with cinnamon, brown sugar, and a touch of lemon to balance sweetness, while the crust gets its signature shine from a simple sugar-butter wash.
Baking at 375°F ensures the filling stays thick and the topping caramelizes beautifully, creating that irresistible contrast between crisp edges and fluffy filling.
What you’ll end up with is a pie that looks like it belongs in a pastry case—golden, crackly, and impossible to resist. The aroma alone will have everyone gathering in the kitchen, and each slice delivers that perfect balance of spiced apples and buttery crust.
This is the kind of pie that makes holidays feel special, even on a weeknight.
Serve warm with vanilla ice cream or whipped cream for the full experience. The sizzling topping stays crispy for hours, so you can slice and serve without worrying about soggy edges. Let’s get baking!
Ingredients for sizzling apple pie
Golden crust meets spiced apples—just these ingredients make bakery-worthy pie magic.
| Ingredient | Amount | Notes |
|---|---|---|
| All-Purpose Flour 🌾 | 3 cups | Sifted for light texture |
| Unsalted Butter 🧈 | 1 ½ cups | Cold, cubed for crust |
| Granulated Sugar 🍚 | ¼ cup | Plus extra for topping |
| Light Brown Sugar 🍚 | ½ cup | Packed for filling |
| Mixed Apples 🍎 | 6 medium | Peeled, cored, sliced |
| Ground Cinnamon 🌿 | 2 tbsp | Freshly ground preferred |
| Lemon Juice 🍋 | 2 tbsp | Freshly squeezed |
| Vanilla Extract 🌸 | 1 tsp | Pure vanilla preferred |
| Salt 🧂 | ½ tsp | Diamond Crystal preferred |
| Turbinado Sugar 🍚 | 1 cup | For caramelized topping |
| Large Egg 🥚 | 1 whole | For egg wash |
| Heavy Cream 🥛 | ¼ cup | For brushing topping |
The apples are everything here. Honeycrisp, Granny Smith, and Braeburn mix gives you the perfect balance of sweet and tart. Trader Joe's or your local produce section usually has these, or grab whatever's crisp and firm. Avoid mealy apples—they turn mushy in the filling. For the crust, Land O'Lakes unsalted butter is my secret weapon (it's salt-free, so you control the flavor). If you're short on time, pre-made pie crust works, but trust me on the homemade version. The sugar-butter topping? That's where the real magic happens—it's what gives you that bakery-style shine.
No turbinado sugar? Light brown sugar works in a pinch, but it won't caramelize as beautifully. Short on apples? Substitute with pear slices—they hold up well too. The cinnamon is non-negotiable, but if you want extra warmth, add half a teaspoon of nutmeg. For the crust, if you're not using a food processor, cut the butter into the flour with a pastry cutter or your fingers—just work fast to keep everything cold. The egg wash? Don't skip it—it's what makes the crust golden and crispy.
This pie tastes even better the next day—honestly, the filling thickens up perfectly. Store leftovers in an airtight container for up to 5 days in the fridge. For the topping, make it ahead and keep it chilled until you're ready to bake—it'll stay crisp. Freeze the whole pie (without the topping) for up to 3 months. Just add the topping fresh before baking. The crust stays crispy for hours after baking, so you can slice and serve whenever you're ready.
Why You'll Love This Recipe
- Uses what you’ve got: flour you already have, butter that’s been lurking in the fridge, and apples that’ll soften before you buy new ones. Plus, leftovers reheat like a dream—crispy edges every time.
- No-Roll-Out Dough: I swear by this butter-and-flour shortcut—just mix, press, fold. No chilling, no fuss, and that flaky crust still holds its shape. (Yes, even when my kids "help" cut it.)
- Caramelized Core: The brown sugar and butter melt into the apples until they’re practically drowning in that rich, sticky glaze. Honestly, I’ve tried store-bought pies—this one’s the only one where the first bite makes me groan.
- Weeknight to Holiday: Same crust, same filling, but it works for a lazy Friday morning as much as Thanksgiving. Serve it warm with vanilla ice cream, or slice it cold for lunchboxes—no judgment here.
Step-by-step instructions for sizzling apple pie
Here's how to build a pie with a caramelized topping that crackles like bakery magic.
Craft the Perfect Crust Layers
In a large mixing bowl, combine the 3 cups all-purpose flour, 0.5 teaspoon salt, and 0.25 cup granulated sugar. Cut in the 1.5 cups cold, cubed unsalted butter using a pastry cutter or your fingers until the mixture resembles coarse crumbs with pea-sized butter pieces. This texture is key—it ensures flaky layers.
Add 0.25 cup heavy cream and mix gently with a fork until the dough just comes together. Divide into two equal portions, flatten into discs, wrap in plastic, and chill for at least 1 hour. Cold dough prevents spreading and maintains structure. I press the discs into 12-inch circles between parchment paper for easy transfer.
Build the Spiced Apple Filling
In a large bowl, toss the 6 medium peeled, cored, and sliced mixed apples with 2 tablespoons lemon juice, 2 tablespoons ground cinnamon, 1 teaspoon vanilla extract, and 0.5 cup packed light brown sugar. Let sit for 15 minutes—this draws out juices and intensifies flavors. The lemon juice prevents browning while the sugar begins caramelizing the fruit.
Spread the apple mixture evenly into the bottom crust, mounding slightly in the center. Brush the edges with beaten large egg to create a seal. This prevents filling from leaking during baking and creates that signature pie crust edge.
Create the Signature Caramelized Topping
In a small saucepan, melt 1 cup turbinado sugar over medium-low heat without stirring until it reaches 325°F on a candy thermometer. This takes about 8-10 minutes—watch closely as sugar burns quickly. The color should turn a deep amber with no brown streaks.
Immediately pour the hot sugar mixture over the top crust in an even layer. The sugar will bubble vigorously and begin caramelizing instantly. Work quickly to spread it evenly before it sets. This technique creates that signature crackly, glass-like topping that's the pie's showstopper.
Bake to Golden Perfection
Preheat oven to 375°F. Place the pie on a parchment-lined baking sheet to catch any drips. Bake for 45-50 minutes until the crust is deep golden brown and the filling bubbles gently. The caramelized topping should be set but still slightly sticky to the touch.
For the final touch, brush the caramelized top with 0.25 cup heavy cream and return to the oven for 5-7 minutes until the cream bubbles and turns golden. This adds richness and enhances the caramel's shine. Let cool for at least 2 hours before slicing—this allows the filling to set properly and prevents a runny pie.
Serve with Confidence
Slice through the caramelized topping with a hot knife for clean cuts. The contrast between the crispy top, flaky crust, and spiced apple filling makes every bite special. Serve warm with vanilla ice cream or whipped cream to balance the pie's richness.
This pie keeps well for 3 days at room temperature or 1 month in the freezer. The caramelized topping actually improves with time, developing deeper flavor as it sits. Store covered to maintain moisture and prevent the topping from drying out.
Pro Tips For Making Sizzling Apple Pie
- Preheat That Pan: Your apple filling won’t sizzle worth a damn if the pie dish is cold. Pop it in a 375°F (190°C) oven for 10 minutes before adding the filling—this jumpstarts the caramelization and gets those apples bubbling like they’re supposed to. (Yes, even if you’re impatient like me.)
- Toss Apples Like a Pro: Skip the lazy "chop and dump" method—toss your sliced apples with the sugar before adding them to the crust. The sugar dissolves faster on the fruit, and you’ll get that deep, buttery caramel flavor instead of a watery filling. (Your future self will thank you.)
- Don’t Overwork the Dough: I learned this the hard way—mixing the butter and flour too much turns your crust into tough, sad crackers. Cut the butter into cold cubes and work it in with a pastry cutter or your fingers until it’s pea-sized, no smaller. Cold butter = flaky layers.
- Vent That Top Crust: If you’re using a full top crust, cut a 3-inch slit in the center before baking. No vent? The steam will trap itself, and your pie will come out soggy instead of golden and sizzling. (And yes, cover it loosely with foil if the edges brown too fast.)
Common mistakes when making great sizzling apple pie
Overbaking the Crust
I’ve seen this happen more times than I can count—pie crusts turning into crispy, hard crackers instead of flaky layers. The key is watching the crust carefully after the first 45 minutes at 375°F. It should be golden brown, not deep brown or blackened.
If it’s browning too quickly, cover the edges with foil to shield them from direct heat. The filling needs time to set, so don’t rush the baking—patience here makes all the difference. 🌟
Underestimating Apple Prep
Skipping the 15-minute rest for the apples or using pre-sliced store-bought apples is a recipe for disaster. Apples release liquid as they cook, and without that rest, the filling becomes watery. Always peel, core, and slice them yourself for the best texture.
If you’re short on time, at least toss them with lemon juice to prevent browning while you prep the crust. Trust me, the difference in flavor and texture is night and day. ✨
Skipping the Egg Wash
This is a rookie mistake that leads to pale, dull crusts. The egg wash isn’t just for looks—it creates a golden, glossy finish and helps seal the edges to prevent filling leaks. Brush the top crust and edges with beaten egg before adding the caramelized topping.
For extra shine, add a splash of heavy cream to the egg wash. The result? A crust that looks like it came from a bakery. 💫
Uneven Sugar Distribution
The caramelized topping is the star of this pie, but uneven sugar distribution can ruin it. Pour the melted sugar over the crust in one smooth motion, then quickly spread it with a spatula.
If you pour it too slowly or let it sit in one spot, you’ll end up with patches of undercaramelized sugar. Work fast—once the sugar hits the crust, it starts setting immediately. A hot knife helps spread it evenly if it starts to thicken too quickly. 🔥
Not Preheating the Oven
This is a basic baking rule, but it’s worth repeating because so many people skip it. A properly preheated oven ensures even baking and that perfect golden crust. Give your oven 15-20 minutes to reach 375°F before sliding the pie inside.
I also like to place a baking sheet on the lower rack to catch any drips from the caramelized topping. A little prep goes a long way in avoiding messy surprises. 💡
Cutting Too Soon
Patience is key here—resisting the urge to slice into that sizzling pie right out of the oven is tough, but necessary. The filling needs at least 2 hours to set properly. If you cut too soon, you’ll end up with a runny, soupy mess.
Let the pie cool completely on a wire rack, and if you’re really impatient, chill it in the fridge for 30 minutes before slicing. Your guests will thank you for the clean, crisp cuts. 🍴
Nutrition facts
Frequently asked questions
Can I make this pie without turbinado sugar?
While turbinado gives the best caramelized color, you can substitute with light brown sugar for a similar effect. Reduce the amount by 1 tablespoon since brown sugar is more moist. For a deeper caramel flavor, add 1 teaspoon molasses to the sugar mixture before melting. The topping will be slightly less glassy but still delicious.
How do I prevent the crust from shrinking?
Chill the dough for at least 1 hour before rolling and always keep it cold while working. Use a 12-inch pie dish and press the dough gently but firmly into the edges. For extra support, blind-bake the bottom crust for 10 minutes at 375°F before adding filling. This creates a sturdy base that won't shrink during baking.
What's the best way to reheat slices?
For crispy topping and warm filling, reheat slices in a 350°F oven for 5-7 minutes> on a baking sheet. Cover with foil if the topping browns too quickly. Alternatively, use the microwave for 20-30 seconds> (covered) to warm without drying. The caramelized topping stays best when reheated quickly—never leave it uncovered.
Can I use a store-bought crust?
Yes! For convenience, use a high-quality refrigerated pie crust. Press it into the dish and crimp edges as directed. Brush with egg wash before adding filling, then proceed with the caramelized topping. The homemade crust adds flakiness, but store-bought works perfectly for a quick version. Just avoid pre-baked crusts—they won't hold up as well with the sugar topping.
Why did my topping turn white instead of caramelized?
This happens if the sugar didn't reach 325°F> or if moisture from the crust caused crystallization. For next time, ensure your pan is clean and dry, and melt the sugar over medium-low heat> without stirring. If it starts to crystallize, remove from heat and stir gently—then try again. A candy thermometer is your best friend for perfect caramelization!