
Desserts
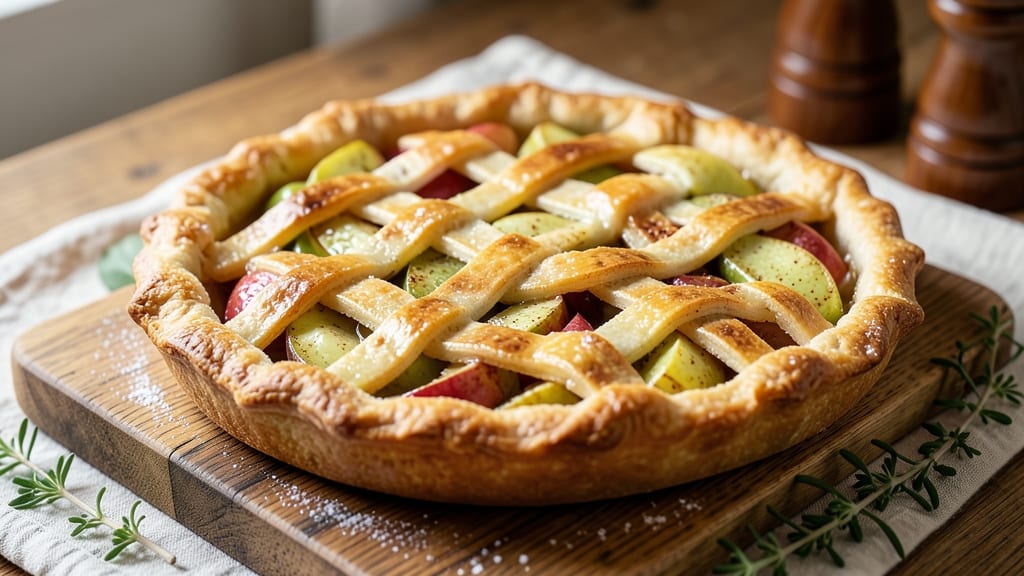
This 9 x 13 apple pie recipe delivers the perfect balance of spiced filling and buttery lattice crust—no deep-dish drama, just foolproof flavor in a single pan. 🍏 The secret lies in a lattice that bakes evenly while keeping the filling tender, and a cinnamon-spice mix that transforms ordinary apples into something extraordinary.
I've baked this version for holiday gatherings and weeknight desserts alike, and it never fails to impress.
The beauty of this recipe is its versatility: use store-bought crust for convenience or roll out your own for that homemade touch. The filling combines tart apples with warm spices that caramelize beautifully during baking, while the lattice adds elegant texture without requiring advanced pastry skills.
Whether you're feeding a crowd or treating yourself, this pie comes together in under an hour and tastes like it took all day.
What makes this recipe truly special is the golden, flaky crust that stays crisp at the edges while remaining tender underneath, paired with a filling that's just soft enough to cut cleanly.
The lattice pattern not only looks stunning but also allows for perfect browning while keeping the center moist. Serve it warm with vanilla ice cream for the ultimate dessert experience.
Ready to bake? This recipe scales perfectly for any occasion—halve the filling for a single-serving skillet pie or double it for a crowd. The lattice technique is simpler than it looks, and I'll walk you through every step to ensure success.
Let's create a pie that'll have everyone asking for seconds.
Ingredients for 9 x 13 apple pie
Eight servings of perfect pie with just these 12 ingredients—no shortcuts, all flavor.
| Ingredient | Amount | Notes |
|---|---|---|
| Granny Smith Apples 🍎 | 6 medium | Peeled, cored, sliced thin |
| All-Purpose Flour 🌾 | 3 ½ cups | For crust and filling |
| Unsalted Butter 🧈 | 1 cup | Cold, cubed for crust |
| Granulated Sugar 🍚 | 1 ½ cups | Plus 2 tbsp for filling |
| Brown Sugar 🍚 | ½ cup | Packed, for filling |
| Ground Cinnamon 🌿 | 2 tbsp | Plus 1 tsp for filling |
| Ground Ginger 🌶️ | 1 ½ tsp | For filling warmth |
| Salt 🧂 | 1 tsp | Kosher or sea salt |
| Lemon Juice 🍋 | 2 tbsp | Freshly squeezed |
| Ice Water 💧 | ½ cup | For dough elasticity |
| Vanilla Extract 🥛 | 1 tsp | Pure vanilla preferred |
| Heavy Cream 🥛 | ¼ cup | For lattice brushing |
Apples are the heart of this pie, so pick firm, tart Granny Smiths—they hold up to baking better than sweet varieties. I always buy mine at Trader Joe's in the fall when they're at their peak, but any grocery store's produce section works. Look for apples that feel heavy for their size and have a vibrant green color. If you can't find Granny Smiths, Honeycrisp or Braeburn are great alternatives—they're a little sweeter but still hold their shape. Peel and core them right before baking to keep them fresh, and slice them thinly for even cooking.
The butter matters here—use unsalted and keep it cold for that perfect flaky crust. No butter? Vegetable shortening works in a pinch, but it won't taste as rich. For the spices, I always grab Penzeys brand if I'm feeling fancy, but the regular grocery store stuff is fine too. The cinnamon should smell warm and inviting—if it smells dusty, toss it. Lemon juice is non-negotiable; it keeps the apples from browning too fast. And that vanilla extract? Pure, not imitation—it makes all the difference in the filling's depth of flavor. If you're short on time, store-bought pie dough works, but trust me, homemade is worth the extra 15 minutes**.
This pie tastes even better the next day, so bake it ahead if you can. Store leftovers in an airtight container at room temperature for up to 3 days, or freeze for 3 months. The lattice crust stays crisp for about 2 hours after baking, so serve it warm with vanilla ice cream. For easy serving, cut into squares before storing—no one wants to wrestle with a whole pie. And if you have extra dough? Make mini pies or turnovers with the scraps—no waste here**
Why You'll Love This Recipe
- No-Roll Crust Hack: I swear by this shortcut—just mix cold butter into flour until it crumbles like sand, then press it into the pan. No rolling pin, no fuss, and it still holds up like a pro’s crust. (Yes, even when my kids "help" press it down.)
- Tart-Sweet Magic: Granny Smiths cut with brown sugar? That’s the secret. The apples stay crisp while the caramelized sugar melts into a sticky, buttery finish—like dessert and comfort food had a baby.
- Double-Duty Pan: Bake it for breakfast the next morning—sliced warm with yogurt or crumbled over oatmeal. Honestly, I’ve even used it as a pie-shaped pizza crust when the kids begged for something "fun." (No judgment.)
- Budget-Friendly Crowd-Pleaser: A single 9x13 pan feeds 12 for under $10 if you use store-brand butter and sugar. Leftovers? They disappear faster than I can reheat them—because this pie tastes just as good cold as it does warm.
Step-by-step instructions for 9 x 13 apple pie with lattice crust
Here's how to create the perfect balance of crisp lattice crust and spiced apple filling that'll make your kitchen smell like autumn.
👨🍳 Step 1: Prepare the Apple Filling
Peel, core, and slice the 6 medium Granny Smith Apples into ¼-inch thick slices. Toss them immediately with 2 tbsp Lemon Juice to prevent browning. In a large bowl, combine the apples with 2 tbsp Granulated Sugar, 2 tbsp Brown Sugar, 1 tsp Ground Cinnamon, and 1 tsp Ground Ginger. Taste and adjust sweetness if needed—Granny Smiths are tart, so don't skimp on sugar!
Spread the apple mixture evenly in a 9 x 13-inch baking dish, mounding slightly in the center. Cover and refrigerate while you make the crust—this keeps the apples from releasing too much liquid while baking. The filling should be packed tightly but not overflowing the edges.
👨🍳 Step 2: Make the Pie Crust Dough
In a large bowl, whisk together 3.5 cups All-Purpose Flour, 1 tsp Salt, and 1 tbsp Granulated Sugar. Cut in 1 cup Unsalted Butter using a pastry cutter or your fingers until the mixture resembles coarse crumbs with pea-sized butter pieces. Sprinkle 0.5 cup Ice Water over the mixture and gently toss with a fork until just combined.
Turn the dough onto a lightly floured surface and knead lightly 6-8 times—just until it comes together. Divide into two equal pieces and flatten each into a ¼-inch thick rectangle. Wrap each in plastic and refrigerate for 30 minutes. This chilling prevents shrinking and makes rolling easier. Here's the thing—don't overwork the dough or you'll get tough crust!
🥘 Step 3: Assemble the Crust and Lattice Top
Unwrap one dough piece and roll it out to fit your 9 x 13-inch pan, about ⅛-inch thick. Transfer to the pan and press gently into the corners. Pour in the chilled apple filling, pressing down lightly. Roll out the second dough piece to ⅛-inch thick and cut into 1-inch wide strips using a pizza cutter or sharp knife.
Arrange the strips in a lattice pattern over the filling, leaving ¼-inch gaps between strips. Here's the trick: brush the lattice with 0.25 cup Heavy Cream mixed with 1 tsp Vanilla Extract for extra shine and flavor. Fold back every other strip, then weave the remaining strips through the gaps to create the classic lattice design. Trim any excess dough hanging over the edges.
🔥 Step 4: Bake to Golden Perfection
Preheat your oven to 375°F. Place a baking sheet on the lower rack and fill it with 1 inch of hot water—this creates steam for a flaky crust. Bake the pie for 45-50 minutes until the crust is deep golden brown and the filling is bubbling vigorously. If the edges brown too quickly, cover them loosely with aluminum foil.
You'll know it's done when the lattice is golden and crisp, and the filling smells intensely spiced. The center should still have a slight jiggle—it'll firm up as it cools. Let the pie rest for 2 hours before slicing (yes, it's worth the wait!). This resting period allows the juices to set and the crust to crisp up properly.
Pro Tips For Making 9 X 13 Apple Pie
- Preheat Pan First: I learned this the hard way—skipping it means your crust will fight you. Put that 9x13 pan in the oven at 375°F for 5 minutes before adding the dough. The butter in the crust melts faster when the pan’s already hot, and you’ll get that perfect golden edge without fighting soggy spots.
- Peel Apples Only Halfway: Granny Smiths stay tart but firm when you peel just the sides, not the bottoms. Leave the rounded undersides intact—they hold shape better during baking, and you’ll avoid that sad, mushy filling. (Yes, it’s a pain to peel carefully, but your pie’s structure will thank you.)
- Vent the Crust Early: If you’re using a double-crust pie, cut the top vents before baking—don’t wait for the filling to bubble. I used to think the filling would rise enough on its own, but steam builds up fast in a 9x13 pan. Slash those vents at 45-degree angles now, or risk a puffy, uneven top.
- Chill the Filling: This isn’t the prettiest method, but it’s the tastiest. After mixing your apples, sugar, and spices, refrigerate the filling for 30 minutes. The starch in the apples releases more juice, but the cold slows it down—your crust won’t turn soggy, and the flavor balances better. (I know, I know, but trust the process.)
Pro cooking tips for this recipe
Crust Perfection
For a flaky lattice crust, keep your butter cold and cubed—never softened. I swear by Plugrá butter for its high fat content, but any unsalted brand works. Cut the butter into the flour using a pastry cutter or your fingers until you see pea-sized pieces.
Overworking the dough makes it tough, so handle it gently—just 6-8 kneads is all you need. 🧈
Lattice Mastery
The key to a beautiful lattice is even 1-inch strips with ¼-inch gaps. Use a pizza cutter for clean lines, and don't press too hard—you want the strips to stay flexible. Brush them with heavy cream + vanilla before weaving for that restaurant-quality shine.
Fold back every other strip first, then weave the rest through like a basket. Trim excess dough neatly with kitchen shears.
Filling Secrets
Granny Smiths release liquid as they bake, so toss them with lemon juice immediately after slicing to prevent browning. For extra tenderness, I add 1 tbsp cornstarch to the filling—it thickens without making it gummy.
Don't skip the 30-minute fridge rest before baking; it prevents a soggy bottom. The filling should bubble vigorously by 45 minutes—if not, tent with foil and bake another 10 minutes.
Oven Tricks
Place a baking sheet with 1 inch hot water on the lower rack to create steam—this makes the crust flaky. If edges brown too fast, cover them with aluminum foil early. The pie is done when the lattice is golden and the filling jiggles slightly in the center.
Let it rest 2 hours before slicing—this crisp-up time is non-negotiable for perfect texture. 🔥
Equipment Must-Haves
Invest in a 9x13-inch glass baking dish—it heats evenly and shows when the crust is golden. A pizza cutter makes lattice strips effortless, and a pie bird (or foil tent) helps with even baking.
For rolling dough, I love the Norpro French Rolling Pin—it's lightweight and gives perfect control. Keep a pastry brush handy for that final cream glaze.
Troubleshooting
If your crust puffs up in spots, it's from steam—just press down gently after baking. For a soggy bottom, blind-bake the crust for 10 minutes before adding filling. Overly sweet filling?
Use Honeycrisp apples instead—they're sweeter than Granny Smiths. And if your lattice collapses, chill the pie for 15 minutes before baking to firm up the dough.
Nutrition facts
Frequently asked questions
Can I use a different apple variety instead of Granny Smith?
While Granny Smiths provide the perfect tartness, you can use Honeycrisp, Braeburn, or Pink Lady apples for a slightly sweeter flavor. For best results, choose firm varieties that hold their shape during baking. If using sweeter apples, reduce the sugar in the filling by 1-2 tablespoons to balance the taste.
How do I make this recipe with a store-bought crust?
Simply replace the homemade dough with two 9-inch pie crusts—one for the bottom and one for the lattice top. Roll out the second crust to ⅛-inch thickness and cut into 1-inch strips for the lattice pattern. Brush the strips with heavy cream + vanilla before weaving. The baking time remains the same at 45-50 minutes.
Why does my lattice crust sometimes collapse?
This usually happens when the dough strips aren't chilled enough before baking. Let the assembled pie rest in the fridge for 15-20 minutes before baking to firm up the lattice. Also, avoid overworking the dough—keep your rolling pin movements light and even. If it collapses slightly, it's still delicious!
Can I prepare this pie ahead of time?
Yes! Assemble the pie (unbaked) and refrigerate for up to 24 hours before baking. For best results, bake it 1-2 days ahead of serving—it tastes even better after resting. Store leftovers in an airtight container at room temperature for 3 days or freeze for 3 months.
What's the best way to reheat sliced apple pie?
For crispy crust and warm filling, reheat slices in a 350°F oven for 5-7 minutes on a baking sheet. Alternatively, use the microwave for 20-30 seconds (cover with a damp paper towel to prevent drying). Serve with vanilla ice cream or whipped cream for the full experience!