
Desserts
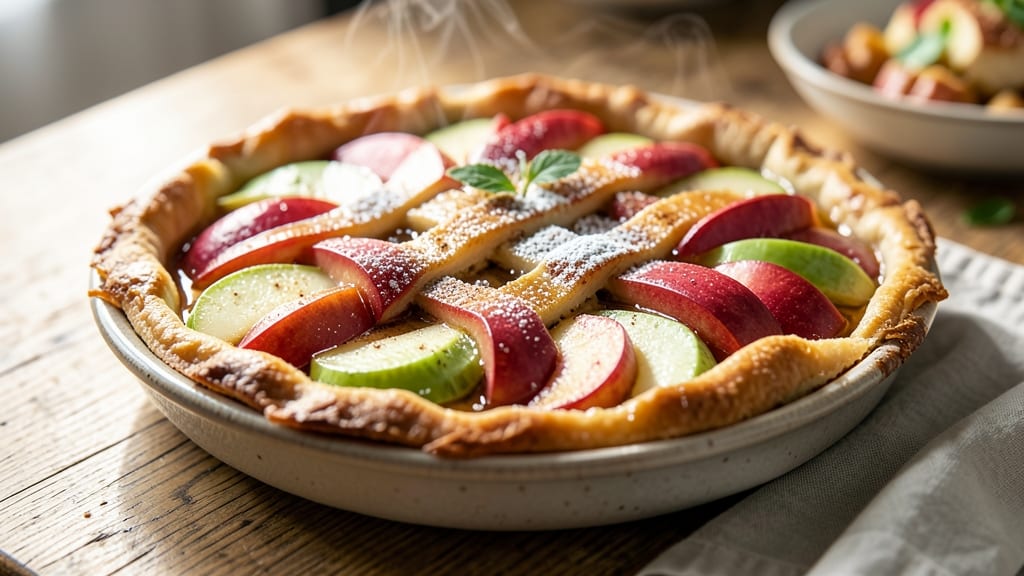
This apple of her eye pie recipe transforms a classic dessert into a showstopper with its golden lattice crust and perfectly caramelized apples. The secret lies in a buttery, flaky crust that stays crisp while encasing tender, spiced apples in a lattice pattern—each slice revealing layers of warmth and texture.
I developed this recipe after years of perfecting apple pies for holidays, and the difference lies in the slow caramelization and precise baking technique that keeps the crust golden without burning.
The filling begins with a mix of tart and sweet apples (Granny Smith and Honeycrisp work best), tossed in cinnamon, nutmeg, and just enough sugar to enhance their natural sweetness. As the pie bakes, the apples release their juices, which caramelize into a glossy, amber glaze that coats every bite.
The lattice crust isn’t just decorative—it creates pockets of steam, ensuring the apples stay tender while the edges crisp to perfection.
What makes this pie truly special is its visual appeal: the golden lattice contrasts beautifully with the deep caramelized filling, and the aroma of spiced apples fills the kitchen long before it’s done.
Serve it warm with a dollop of vanilla ice cream or a drizzle of honey butter for the ultimate dessert experience. The name isn’t just whimsical—it’s a promise of a pie so delicious, it’ll feel like a hug in every bite.
For an extra touch, top the pie with a single apple slice arranged like an eye in the center, or dust it with powdered sugar for a snowy finish. This pie isn’t just dessert—it’s a centerpiece, a tradition, and a recipe you’ll reach for again and again. Let’s get baking!
Ingredients for apple of her eye pie
Golden lattice crust meets caramelized apples—this pie is all about perfect balance and showstopping presentation.
| Ingredient | Amount | Notes |
|---|---|---|
| Granny Smith Apples 🍎 | 3 whole | Peeled, cored, sliced into 1/4-inch pieces |
| Honeycrisp Apples 🍎 | 3 whole | Peeled, cored, sliced into 1/4-inch pieces |
| All-Purpose Flour 🌾 | 4 cups | Plus 2 tbsp for dusting |
| Unsalted Butter 🧈 | 1 cup | Cold, cubed, for crust |
| Granulated Sugar 🍚 | 1 ¼ cups | Plus 2 tbsp for filling |
| Light Brown Sugar 🍚 | ¼ cup | Packed, for filling |
| Ground Cinnamon 🌿 | 2 tbsp | Plus 1 tsp for filling |
| Ground Nutmeg 🌿 | ½ tsp | Freshly grated preferred |
| Salt 🧂 | 1 tsp | Fine sea salt |
| Lemon Juice 🍋 | 1 tbsp | Freshly squeezed |
| Vanilla Extract 🌸 | ½ tsp | Pure vanilla preferred |
| Ice Water 💧 | ¼ cup | For dough |
| Powdered Sugar 🍚 | 2 tbsp | For dusting |
The apples are the heart of this pie, so pick firm, vibrant Granny Smith and Honeycrisp—their tart-sweet balance is key. Costco or Trader Joe's usually have them prepped for baking, but if you're peeling and slicing yourself, work quickly to prevent browning. For the crust, avoid pre-shredded butter—it melts too easily. Buy a stick of Land O'Lakes or Plugrá for reliable cold cubes. The lattice technique relies on even strips, so use a pizza cutter or sharp knife for clean lines. If you're nervous about the lattice, practice on parchment first—it's easier than it looks.
No Granny Smith? Fuji or Braeburn work in a pinch, but they're less tart. Short on cinnamon? Substitute with 1 tsp pumpkin pie spice, though it'll have a different flavor profile. The brown sugar in the filling can be swapped for white sugar if you prefer, but the molasses notes add depth. For the crust, if you don't have vanilla extract, 1/2 tsp vanilla bean paste works beautifully. The ice water in the dough is non-negotiable—it keeps the butter cold and prevents a tough crust. If your kitchen's humid, chill the dough for 30 minutes before rolling.
The crust dough keeps for 3 days wrapped in plastic in the fridge, or 3 months frozen. The filling can be prepped ahead and stored in an airtight container for 2 days before baking. For the lattice, cut strips 1/2-inch wide—they'll shrink slightly as they bake. The pie tastes even better the next day, so bake it early if you're serving it warm. Store leftovers covered at room temperature for 2 days, or freeze slices for 1 month. The eye design? Use a small apple slice arranged in the center before baking—it'll stay crisp.
Why You'll Love This Recipe
- No Fuss Assembly: I swear by this crust—just butter, flour, and a pinch of salt. Roll it out while the oven preheats, no chilling required, and that flaky magic happens in under 10 minutes. (Yes, even on a Tuesday night.)
- Tart-Sweet Magic: Granny Smiths hold their shape while Honeycrisp melts into buttery perfection. The sugar caramelizes just enough to make every bite feel like a hug—crisp edges, tender center, no mushy apples in sight.
- Leftovers? More Like Leftovers Loved: This pie reheats beautifully—slice it warm the next day with vanilla ice cream or pack it for lunch. Honestly, I’ve had it cold for breakfast with peanut butter, and no one batted an eye.
- Budget-Friendly Crowd-Pleaser: Five ingredients, zero specialty items. The butter and flour stretch far, and apples are cheaper than you think when you buy them in season. Feed a houseful for less than takeout, and they’ll ask for seconds.
Step-by-step instructions for caramelized apple lattice crust pie
Here's the method for a perfectly golden lattice crust with tender, caramelized apples inside.
👨🍳 Step 1: Prepare the Apple Filling
In a large bowl, combine the peeled and sliced 3 whole Granny Smith Apples and 3 whole Honeycrisp Apples. Toss gently with 1 tbsp Lemon Juice and 0.5 tsp Vanilla Extract to prevent browning and add brightness. Let this mixture sit for 15 minutes while you prepare the crust.
In a separate small bowl, whisk together 1.25 cups Granulated Sugar, 0.25 cup Light Brown Sugar, 2 tbsp Ground Cinnamon, 0.5 tsp Ground Nutmeg, and 1 tsp Salt. Sprinkle this spice mixture evenly over the apples and toss gently to coat. The apples should look glossy and well-distributed with spices. This balance of sweet and tart flavors is what makes this pie special.
👨🍳 Step 2: Make the Pie Crust Dough
In a large mixing bowl, combine the 4 cups All-Purpose Flour and 1 tsp Salt. Cut in the 1 cup Unsalted Butter using a pastry cutter or your fingers until the mixture resembles coarse crumbs with pea-sized butter pieces. This texture is crucial for creating flaky layers in the crust.
Gradually add the 0.25 cup Ice Water, one tablespoon at a time, mixing gently with a fork just until the dough comes together. Be careful not to overmix—stop as soon as the dough forms a shaggy mass. Turn the dough onto a lightly floured surface and knead it just 4-5 times until smooth. Divide the dough into two equal portions, flatten into discs, wrap in plastic wrap, and refrigerate for at least 30 minutes while you preheat the oven.
🍳 Step 3: Assemble the Pie
Preheat your oven to 375°F. Roll out one of the chilled dough discs on a lightly floured surface to a 12-inch circle, about 1/8-inch thick. Transfer this crust to a 9-inch pie dish, pressing gently to fit. Trim any excess dough hanging over the edge, leaving about 1/2-inch overhang. Crimp the edges decoratively using your fingers or a fork.
Pour the prepared apple filling into the crust, mounding it slightly in the center. Sprinkle the additional 2 tbsp Granulated Sugar and 1 tsp Ground Cinnamon over the top for extra sweetness and spice. The filling should be level but not packed down—this ensures even cooking and caramelization.
🥘 Step 4: Create the Lattice Topping
Roll out the second dough disc to a 12-inch circle as well. Using a sharp knife or pizza cutter, cut the dough into 12 strips, about 1/2-inch wide. Lay 6 strips horizontally across the pie, spacing them about 1/4-inch apart. Fold the ends of each strip down to create a neat edge.
Now lay the remaining 6 strips vertically over the horizontal strips, again spacing them 1/4-inch apart and folding the ends down. This creates the classic lattice pattern that allows steam to escape while keeping the filling moist. Brush the lattice with a bit of water to help it brown beautifully in the oven.
🔥 Step 5: Bake to Golden Perfection
Place the assembled pie on a baking sheet lined with parchment paper to catch any drips. Bake in the preheated 375°F oven for 45-50 minutes, until the crust is deep golden brown and the filling is bubbling gently at the edges. The lattice should look crisp and the apples should be tender when pierced with a knife.
Remove the pie from the oven and let it cool on a wire rack for at least 2 hours before slicing. This resting period allows the filling to set slightly and makes it easier to cut clean slices. Once cooled, dust the top with 2 tbsp Powdered Sugar for a beautiful finish. The contrast of the golden lattice against the caramelized apples makes this pie truly stunning.
Pro Tips For Making Apple Of Her Eye Pie
- Prep Apples Like a Pro: Core the Granny Smiths first—they’re firmer and hold their shape better when sliced. Then cut the Honeycrisp into slightly thicker pieces (¼-inch) since they soften faster; toss them in lemon juice right away to keep that bright color and crisp texture you’re after.
- Blind-Bake the Crust: Skip the pie weights and use dried beans or even uncooked rice instead—they’re free, reusable, and spread evenly. Cover the crust with foil and bake at 375°F for 15 minutes before filling. This guarantees a flaky base that won’t turn soggy when those juicy apples hit the oven.
- Sweeten the Filling Gradually: Start with half the sugar called for and taste after 10 minutes of simmering. The apples release their own sweetness as they cook, and you’ll end up with a balanced flavor instead of a cloying syrup. (Yes, even if you’re impatient like me.)
- Vent That Top Crust: Cut a few small slits in the lattice or solid top crust before baking—it’s not just for looks. This lets steam escape, preventing a gummy center from trapped moisture. If you’re using a full top crust, brush it with egg wash after the first 20 minutes to avoid a soggy top.
Essential equipment for apple of her eye pie
Pie Dish Essentials
Start with a 9-inch glass or ceramic pie dish—it distributes heat evenly and prevents soggy bottoms. I recommend Pyrex glass for its durability and even baking. Avoid dark-colored dishes, as they absorb heat too quickly and can burn the crust edges.
If you don’t have a pie dish, a 9-inch cast-iron skillet works in a pinch, but grease it well to prevent sticking. 🔥
Lattice Tools
A pizza cutter or sharp chef’s knife is your best friend for clean lattice strips. I use a pizza cutter because it glides smoothly through chilled dough without tearing.
For precise cuts, place the dough on a parchment-lined tray to prevent sticking. If your strips aren’t uniform, don’t stress—just fold the edges neatly to hide any imperfections.
Crust Rolling Tools
Roll out the dough on a lightly floured surface using a rolling pin or even a wine bottle in a pinch. For even thickness, roll from the center outward, rotating the dough 90 degrees after each pass.
A pie crust roller (like the OXO Good Grips) saves time and ensures consistent thickness. Avoid over-flouring—the dough should only need a light dusting to prevent sticking.
Baking Gear
Line your baking sheet with parchment paper to catch drips and make cleanup easier. I use a half-sheet pan for stability, especially when baking a heavy lattice pie. A pie cooling rack is a game-changer—it prevents soggy bottoms by allowing air circulation.
If you’re short on time, a wire rack over a baking sheet works too. 💡
Decorative Extras
For the "apple of her eye" touch, use a small apple slice or a pastry brush to paint edible gold leaf for a luxurious finish. A dusting sifter makes powdered sugar application even and professional.
If you’re feeling fancy, add a sprig of fresh rosemary or cinnamon sticks as garnishes—they add aroma and visual appeal without overpowering the pie.
Temperature Tools
An oven thermometer is non-negotiable—most home ovens run hotter than their settings. I use a Thermoworks Oven Thermometer to ensure my 375°F bake is accurate. For lattice perfection, a spray bottle with water helps crisp the edges beautifully.
If your oven has hot spots, rotate the pie halfway through baking for even browning.
Nutrition facts
Frequently asked questions
Can I make this pie without a lattice crust?
For a simpler version, use a single 9-inch crust and top it with sliced apples arranged in a circular pattern. Cover with another full crust or a pie crust disc cut with a few slits for steam. The filling will still caramelize beautifully—just expect slightly less visual drama.
What's the best way to store leftovers?
Keep slices wrapped at room temperature for 2 days or freeze for 1 month. For reheating, warm in a 350°F oven for 10-15 minutes with foil to retain moisture. Avoid microwaving—it makes the crust soggy. The pie actually tastes better the next day as flavors meld!
Can I substitute apple varieties?
Yes! For tartness, use Granny Smith or Braeburn. Sweeter apples like Gala or Fuji work too—just reduce sugar in the filling by 1-2 tablespoons. Avoid overly soft varieties like Red Delicious, as they won't hold up during baking. The key is a mix of tart and sweet for balance.
Why did my crust turn out pale?
Pale crusts usually mean the butter melted too soon during baking. Next time, chill the dough longer (1 hour instead of 30 minutes) and consider brushing the lattice with egg wash before baking for extra browning. Also, ensure your oven is properly calibrated—most run 25°F hotter than set!
How do I achieve the "eye" design?
For the signature touch, place a thin apple slice in the center before baking (like an eye's pupil). For extra flair, use a pastry brush to paint edible gold leaf around it. Alternatively, dust powdered sugar in a circular pattern after baking to mimic an eye shape. The lattice itself creates natural "veins" that enhance the effect!