
Desserts
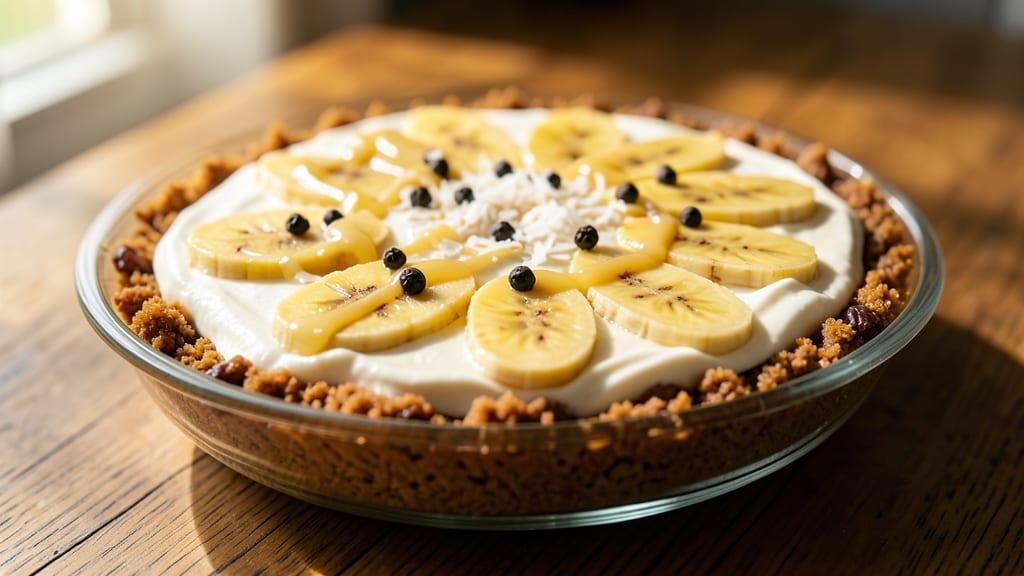
This raw vegan banana cream pie delivers all the creamy, dreamy layers of classic banana cream pie—without baking, dairy, or refined sugar. 💛 The secret lies in blending cashews into a velvety, tangy cream that replaces traditional custard, while dates and coconut milk create a rich, caramelized filling that mimics the texture of cooked bananas.
What makes this recipe truly special is how it captures that nostalgic comfort without compromising on health or ethics.
The foundation starts with a no-bake crust made from nuts and dates, providing the perfect sturdy base that holds up to the creamy filling. The filling itself is a game-changer—ripe bananas blended with coconut cream and vanilla create a luscious, almost custard-like texture that stays firm when chilled.
Topped with a nutty crunch layer, this pie tastes like a decadent dessert while being entirely plant-based and refined sugar-free.
By the time you take that first slice, you'll experience the magic: a creamy banana filling that's rich yet light, a crust with just the right amount of crunch, and a velvety cream layer that feels indulgent.
The best part? It requires no oven, no refined sugar, and no dairy—just a food processor and a little patience. This is dessert that feels both virtuous and utterly satisfying.
Perfect for potlucks, holiday gatherings, or treating yourself without guilt, this recipe proves that raw vegan desserts can be just as impressive as their traditional counterparts. Let's get started on creating your no-bake, plant-based masterpiece!
Ingredients for raw vegan banana cream pie
Velvety cashew cream meets caramelized banana filling in this no-bake dessert masterpiece.
| Ingredient | Amount | Notes |
|---|---|---|
| Raw Cashews 🥜 | 1 ½ cups | Soaked 4+ hours for creaminess |
| Pitted Dates 🍈 | 1 ½ cups | Medjool preferred for sweetness |
| Ripe Bananas 🍌 | 4 large | Spotty skins, very soft inside |
| Full-Fat Coconut Milk 🥥 | 1 can | Cream only for richness |
| Pure Vanilla Extract 🌿 | 1 tbsp | Alcohol-free if preferred |
| Lemon Juice 🍋 | 1 tbsp | Freshly squeezed |
| Raw Walnuts 🌰 | 1 ½ cups | Chopped for crunch layer |
| Almond Flour 🌾 | 1 ½ cups | Fine texture preferred |
| Coconut Oil 🫒 | ½ cup | Melted for crust binding |
| Cocoa Powder 🍫 | 2 tbsp | Unsweetened for crust depth |
| Sea Salt 🧂 | ½ tsp | Fine grain preferred |
| Maple Syrup 🍁 | 1 tbsp | Grade B for caramel notes |
| Coconut Flakes 🥥 | ¼ cup | Toasted for garnish |
The cashews are non-negotiable here—soaking them 4+ hours (or overnight) is essential for that ultra-smooth texture. Trader Joe's sells pre-soaked cashews if you're in a rush, but they cost more. For dates, Medjool has that perfect caramelized sweetness, but regular pitted dates work too—just blend longer. The bananas should be so ripe they're practically falling apart (think spotty skins, very soft inside). If they're too firm, your filling won't have that custard-like quality. And for the coconut milk, grab the full-fat can—you only need the thick cream part, not the watery stuff.
No cashews? Macadamia nuts or almonds work in a pinch, but they'll change the texture slightly. Short on dates? Fig jam or date syrup can add sweetness, though the texture won't be identical. The walnuts in the crunch layer can be swapped for pecans or hazelnuts if that's what you've got. For the crust, if you can't find almond flour, blend raw almonds into a fine powder—it takes 10 minutes but works perfectly. The cocoa powder matters here too—unsweetened Dutch-processed gives the best flavor, but regular will do in a bind. And that maple syrup? Grade B has those lovely caramel notes that make this taste even more decadent.
This pie keeps beautifully—5-7 days in the fridge covered tightly. The crust stays crisp, the filling stays creamy, and the nut layer keeps its crunch. For serving, I like to dust with extra cocoa powder and toasted coconut flakes right before slicing. It freezes wonderfully too—2 months in an airtight container. Just let it thaw in the fridge overnight before serving. Pro tip: Assemble the pie a day ahead if you can—flavors meld even better after chilling.
Why You'll Love This Recipe
- No Blender Overload: I swear by this recipe because it only needs a quick soak and a few pulses—not hours of blending. Soak the cashews and dates for 30 minutes, then blend the creamy filling in under a minute. That’s it. No stress, no waiting for machines to heat up.
- Taste Like Childhood: Here’s what sold me—the vanilla and coconut milk make it ridiculously close to classic banana cream pie, but without the guilt. The bananas add natural sweetness, while the cashews give that rich, velvety texture. Trust me, even my non-vegan friends ask for seconds.
- Potluck Star: Between us, this is my secret weapon for gatherings. It’s sturdy enough to travel, looks impressive in a pie dish (or even a bowl), and everyone assumes it’s way more complicated than it is. Bonus: No one bats an eye at the "vegan" part when it’s this good.
- Budget-Friendly Luxury: I’ll be real—cashews can be pricey, but this recipe uses them smartly. A small bag goes a long way, and the dates stretch the filling without sacrificing flavor. Plus, bananas and coconut milk are often cheaper than store-bought desserts. Feels fancy, costs less.
Step-by-step instructions for raw vegan banana cream pie
Here's how to create a lusciously creamy, no-bake wonder that's pure comfort food magic!
👨🍳 Step 1: Soak and Blend the Creamy Base
Start by draining and rinsing the soaked 1.5 cups raw cashews thoroughly. Place them in a high-speed blender with the 1.5 cups pitted dates, 4 large ripe bananas (peeled), 1 can full-fat coconut milk (just the cream), 1 tablespoon pure vanilla extract, and 1 tablespoon lemon juice. The bananas should be very soft with spotty skins—this ensures perfect sweetness and creaminess.
Blend on high for 1-2 minutes until completely smooth, scraping down the sides as needed. You're aiming for a thick, pudding-like consistency that coats the back of a spoon. If it's too thick, add 1-2 tablespoons water to reach the perfect pouring texture. Here's the thing—this base is the heart of your pie, so take your time getting it just right. The mixture should be vibrant yellow with no visible chunks.
🥘 Step 2: Prepare the Crust Layer
In a separate bowl, combine the 1.5 cups almond flour, 1.5 cups raw walnuts (chopped), 2 tablespoons cocoa powder, 0.5 teaspoon sea salt, and 1 tablespoon maple syrup. Mix thoroughly with your hands until you have a crumbly texture. Then add the 0.5 cup melted coconut oil and work it in until the mixture holds together when pressed.
Press this mixture firmly into a 9-inch pie dish, packing it down evenly to create a solid base. I like to use the bottom of a glass to press it down smoothly. Chill in the freezer for 15 minutes while you prepare the filling. This chilling step is crucial—it prevents the crust from dissolving when you add the creamy banana mixture later. The crust should be firm enough to hold its shape when you run your finger along the edge.
🍳 Step 3: Assemble and Chill the Pie
Remove the crust from the freezer and carefully pour the blended banana mixture over it, spreading it evenly to the edges. Use a spatula to smooth the top and create clean edges. Here's where it gets fun—sprinkle the 0.25 cup toasted coconut flakes evenly over the top for that classic pie garnish and extra crunch. The coconut should be lightly toasted to bring out its nutty flavor and prevent it from becoming soggy.
Cover the pie with parchment paper and place it in the refrigerator to set for at least 4 hours, or preferably overnight. This long chilling time allows all the flavors to meld together perfectly. The pie will firm up beautifully, with a creamy texture that's almost like traditional banana cream pie. Real talk: patience here makes all the difference—rushing will give you a runny mess instead of that perfect sliceable texture.
⏰ Step 4: Serve and Enjoy Your No-Bake Masterpiece
When you're ready to serve, run a knife around the edges of the pie to loosen it from the dish. Then carefully slide it onto a serving plate. The crust should hold together beautifully, with clean slices that reveal that luscious banana cream filling. Cut into 8 equal wedges—each slice should have that perfect balance of creamy filling, nutty crust, and toasty coconut topping.
Serve immediately for the best texture, but the pie will keep well in the refrigerator for up to 5 days. I know it seems like too much work to make ahead, but trust me—the flavors actually improve as it sits! Store any leftovers covered to maintain that creamy perfection. This pie is pure indulgence without any guilt, and it's sure to become your new favorite dessert.
Pro Tips For Making Raw Vegan Banana Cream Pie
- SOAK CASHEWS 4 HOURS: I learned this the hard way—skipping the full soak leaves your filling grainy, no matter how well you blend. Toss them in hot water for 10 minutes first, then top up with cold water and let them sit. The texture difference is night and day.
- PICK SOFT DATES: Hard dates? Tough luck. They won’t break down properly, leaving your filling with an unpleasant bite. Go for the sticky, pliable ones—if they’re not soft enough, toss them in warm water for 15 minutes. No excuses.
- BLEND IN STAGES: Dumping everything in the blender at once just clogs the motor. Start with the cashews, dates, and a splash of coconut milk to make a smooth paste, then add the bananas and remaining coconut milk. This keeps the filling light and creamy.
- FREEZE THE CRUST: This isn’t the prettiest method, but it’s the tastiest. After pressing your crust into the pan, pop it in the freezer for 20 minutes before adding the filling. It firms up just enough to hold its shape—no soggy bottoms, no messy cleanup.
Creative variations of this recipe
Tropical Twist
Swap the walnuts in the crunch layer for 1 cup toasted macadamia nuts and add ½ cup shredded coconut to the crust. Stir in 1 teaspoon grated lime zest and 1 tablespoon lime juice to the banana filling for a bright, island-inspired flavor.
Garnish with mango slices before chilling for a refreshing contrast. 🌴
Chocolate Lover's Upgrade
Boost the cocoa content by adding ¼ cup cocoa powder to the banana filling blend. Fold in 2 tablespoons almond butter for extra richness, and top with dark chocolate shavings before serving.
For a molten center effect, press ¼ cup melted dark chocolate into the crust before adding the filling. 🍫
Nut-Free Crust
Replace the almond flour and walnuts with 1.5 cups rolled oats and ½ cup sunflower seeds (finely ground). Add 1 tablespoon chia seeds to the crust mixture for binding. This version works perfectly for nut allergies while keeping the same sturdy texture. 🌾
Spiced Caramel Version
Infuse the banana filling with ½ teaspoon cinnamon, ¼ teaspoon nutmeg, and ¼ teaspoon ginger for a warm, spiced flavor. Add 2 tablespoons date syrup to the crust for extra caramel depth. Garnish with candied pecans for a Southern-inspired twist. ✨
Coffee Banana Cream
Add 1 tablespoon instant coffee granules to the banana filling for a mocha-inspired flavor. Enhance the crust with 1 teaspoon espresso powder mixed into the melted coconut oil. Top with whipped coconut cream and a sprinkle of cocoa powder for a sophisticated dessert. ☕
Seasonal Berry Swap
Replace half the bananas with 1 cup mixed berries (fresh or frozen) for a fruitier version. Add 1 tablespoon lemon zest to brighten the filling. Garnish with fresh berries and a drizzle of raspberry coulis** to complement the seasonal flavors. 🍓
Nutrition facts
Frequently asked questions
Can I make this pie without a food processor?
Yes, but with some adjustments! For the creamy base, soak your cashews extra long (6+ hours) and blend them with dates in a high-powered blender first, then mash the bananas separately before mixing everything together. The texture won't be as silky, but it'll still taste delicious. For the crust, pulse nuts in a food processor until finely ground, or grind them in a coffee grinder in batches.
How do I prevent the crust from getting soggy?
Prevent sogginess with these key steps: First, chill the crust in the freezer for 15-20 minutes before adding filling. Second, let the banana mixture cool slightly before pouring (it shouldn't be warm). Finally, press the crust firmly into the pie dish so it creates a solid barrier. If needed, add a thin layer of melted coconut oil between crust and filling as an extra moisture barrier.
What's the best way to ripen bananas for this recipe?
For perfect bananas, place them in a paper bag with an apple or two at room temperature. Check daily—they're ready when skins have dark spots and yield slightly to gentle pressure. Overripe bananas (very soft with brown spots) work best, as they're sweeter and blend more smoothly. If your bananas aren't ripe enough, try placing them in a warm oven (200°F) for 30 minutes to speed up ripening.
Can I make this pie ahead of time?
This pie actually tastes better when made ahead. Assemble the pie and refrigerate for at least 4 hours, but overnight is ideal. The flavors meld beautifully, and the texture becomes even more perfect. Store covered in the fridge for up to 5 days. For freezing, assemble and freeze the pie (uncovered) for 2 hours, then wrap tightly in plastic wrap and foil. Thaw overnight in the fridge before serving.
What if I don't have walnuts for the crunch layer?
No problem! Swap walnuts for pecans, hazelnuts, or even toasted pumpkin seeds for a different texture. For a seed-only option, use 1.5 cups sunflower seeds (toasted and finely chopped). If you want a nut-free version, try 1.5 cups rolled oats mixed with 1 tablespoon chia seeds for binding. Just adjust the amount of melted coconut oil in the crust mixture to help everything hold together.