
Desserts
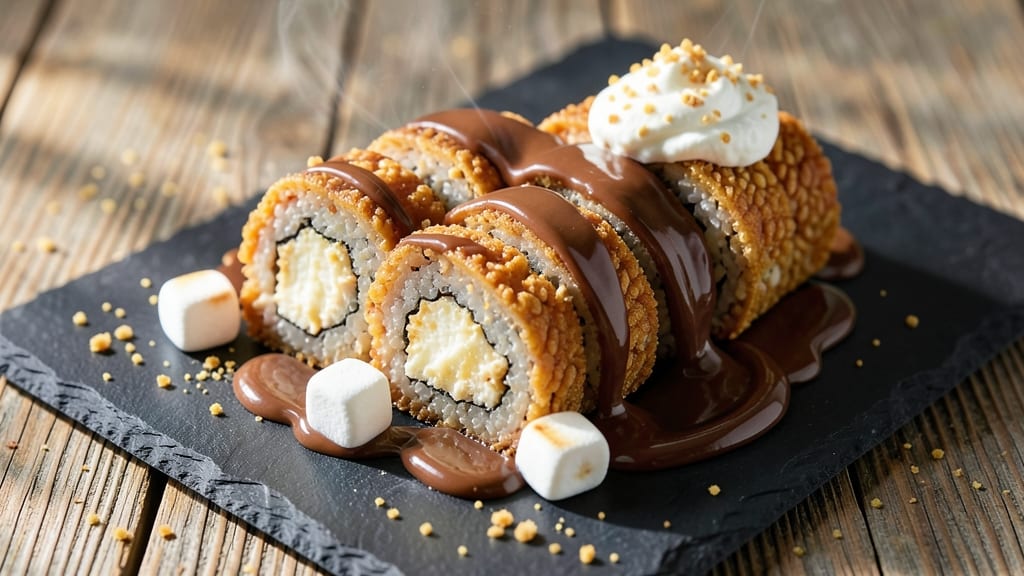
This Rice Krispie sushi recipe transforms a childhood classic into a gourmet dessert that’s equal parts nostalgic and impressive. 🌟 The secret lies in balancing crispy Rice Krispie clusters with creamy fillings—like vanilla cream cheese or Nutella—all wrapped in delicate sushi-style rolls.
Perfect for parties, potlucks, or satisfying a sweet tooth, these treats are vegetarian, customizable, and guaranteed to disappear quickly.
The magic starts with a foolproof Rice Krispie mixture—melted marshmallows and butter bind the cereal into clusters, while vanilla extract adds depth.
Shape them into tight rolls, then secure with your choice of filling (cream cheese, jam, or chocolate spread) and a final dusting of powdered sugar for that restaurant-worthy finish. The contrast of crispy, creamy, and chewy textures makes every bite unforgettable.
What sets this recipe apart is the presentation—think elegant, bite-sized sushi rolls that look as good as they taste. Use a sharp knife to slice cleanly, and arrange them on a platter with fresh berries or mint for a pop of color.
The best part? It’s a one-bowl dessert that comes together in under 30 minutes, with no baking required.
Whether you’re feeding a crowd or treating yourself, this recipe delivers restaurant-quality results without the fuss. The fillings are entirely customizable—swap in peanut butter, fruit preserves, or even whipped cream for endless variations. Ready to elevate a simple snack into something extraordinary?
Ingredients for rice krispie sushi
These twelve ingredients transform nostalgic Rice Krispies into elegant, restaurant-worthy sushi rolls.
| Ingredient | Amount | Notes |
|---|---|---|
| Rice Krispies Cereal 🍚 | 6 cups | Original flavor preferred |
| Unsalted Butter 🧈 | ½ cup | Cold, cubed for even melting |
| Mini Marshmallows 🍫 | 3 cups | Standard size, not jumbo |
| Vanilla Extract 🌿 | 1 tsp | Pure, high-quality preferred |
| Vanilla Cream Cheese 🧀 | 8 oz | Room temperature for spreading |
| Nutella or Chocolate Spread 🍫 | ½ cup | For filling variations |
| Powdered Sugar 🍚 | ¼ cup | For dusting and binding |
| Vanilla Frosting 🍰 | ½ cup | Store-bought or homemade |
| Plastic Wrap 📄 | 1 sheet | For rolling and shaping |
| Sharp Knife ✂️ | 1 whole | For clean slicing |
| Fresh Berries 🍓 | ½ cup | For garnish (optional) |
| Mint Leaves 🌿 | 6 whole | For garnish (optional) |
The Rice Krispies and mini marshmallows are the foundation—original flavor cereal ensures the right texture, while standard-sized marshmallows melt evenly. For the butter, unsalted is essential to avoid overpowering the sweetness, and cubing it ensures even melting. Trader Joe’s and Whole Foods carry high-quality marshmallows in bulk, and Ghirardelli or Land O’Lakes unsalted butter are reliable choices. The vanilla extract should be pure, like McCormick or Nielsen-Massey, to add depth without artificial aftertaste. For the cream cheese, Philadelphia brand or Kraft vanilla works best when softened to room temperature for smooth spreading.
No vanilla cream cheese? Substitute with whipped cream cheese or Nutella mixed with cream cheese for a chocolate twist. Powdered sugar can be swapped for confectioners’ sugar if unavailable, though it may clump slightly. For the Nutella, any chocolate spread works—Ferrero Rocher or Hershey’s chocolate hazelnut spread are great alternatives. The vanilla frosting can be homemade (powdered sugar + butter + milk) or store-bought like Betty Crocker or Duncan Hines. If you’re avoiding powdered sugar, icing sugar from Domino is a direct substitute. For presentation, plastic wrap must be lightly greased with butter to prevent sticking, and a sharp serrated knife ensures clean slices.
The Rice Krispie mixture keeps for 3 days in an airtight container at room temperature, though it’s best used fresh. Cream cheese and Nutella should be refrigerated separately until ready to use. For longer storage, freeze the assembled rolls (without powdered sugar) for up to 2 months—thaw at room temperature before serving. Fresh berries and mint add brightness but can be omitted; store them separately until plating. Powdered sugar should be sifted through a fine-mesh sieve for an even, professional finish. Double-wrap finished rolls in plastic wrap to maintain crispness during transport.
Why You'll Love This Recipe
- No Burnt Marshmallow Drama: I’ve ruined enough Rice Krispie treats to know this method actually works—just melt the butter, fold in the marshmallows quickly, and you’re golden. No sticky pan, no sad, half-melted lumps at the bottom.
- Sweet-Salty Magic: That creamy vanilla cream cheese swirled into the mix? It’s the secret weapon. The crispy Rice Krispies hold up perfectly while the marshmallow center stays gooey, and the vanilla extract ties it all together like a hug from your favorite dessert.
- Party Trick Ready: Roll these into little sushi rolls or leave them as squares—either way, they’re instantly impressive. Serve them at a kids’ birthday, a lazy Sunday brunch, or even as a midnight snack when you’re craving something nostalgic but fancy.
- Pantry Staple Power: You’re already using stuff you have—no specialty ingredients, no last-minute grocery runs. The leftovers? Even better cold, sliced thin for a quick snack or breakfast. Budget-friendly, foolproof, and zero guilt.
Step-by-step instructions for crunchy Rice Krispie sushi clusters
Transform simple pantry staples into elegant, bite-sized treats with this foolproof method.
🍳 Step 1: Melt Butter and Combine with Marshmallows
In a large, heavy-bottomed saucepan, melt the 0.5 cup unsalted butter over medium-low heat. Watch carefully as it melts completely, then immediately remove from heat to prevent overheating. Add the 3 cups mini marshmallows all at once and stir vigorously with a wooden spoon for 1-2 minutes until fully melted and smooth.
Here's the thing—don't let the mixture simmer. You're looking for a glossy, creamy consistency, not crispy marshmallow bits. If it starts to bubble too vigorously, remove the pan from heat momentarily. The marshmallows should dissolve completely, creating a thick, syrupy base for your sushi clusters.
👨🍳 Step 2: Mix in Cereal and Vanilla Extract
Working quickly, stir in the 6 cups Rice Krispies Cereal using a silicone spatula. The cereal will absorb the marshmallow mixture immediately, so keep stirring until every piece is evenly coated and the mixture resembles damp sand. Add the 1 tsp vanilla extract and mix thoroughly to distribute the flavor evenly throughout.
I press down gently on the mixture with the spatula during this step—this prevents air pockets and ensures even distribution of the marshmallow coating. You'll notice the mixture will be warm to the touch but not hot. If it's too sticky to handle, sprinkle a tiny bit of powdered sugar (about 1 tablespoon) to help bind it.
🥘 Step 3: Prepare the Cream Cheese Filling
In a separate bowl, combine the 8 oz vanilla cream cheese (at room temperature) with the 0.5 cup Nutella or chocolate spread. Mix with a fork until completely smooth and well blended. The mixture should be thick but spreadable—if it's too firm, let it sit at room temperature for another 5 minutes to soften.
This is where you can get creative. For a fruity twist, fold in 2 tablespoons of vanilla frosting to the cream cheese mixture. The frosting adds moisture and helps create a smoother texture when spreading. Keep this mixture covered while you prepare the cereal clusters to prevent drying.
🔪 Step 4: Shape and Roll the Sushi Clusters
Line a clean work surface with the plastic wrap and transfer about 1 cup of the cereal mixture onto it. Using your hands, gently press and shape the mixture into a 1-inch thick rectangle about 8x6 inches in size. You want it firm enough to hold its shape when rolled but not packed too tightly.
Spread approximately 2 tablespoons of the cream cheese filling evenly over the rectangle, leaving a ½-inch border around the edges. This border prevents the filling from oozing out during rolling. Using the plastic wrap as a guide, carefully roll the rectangle into a tight log, sealing the plastic wrap around it to maintain the shape.
⏰ Step 5: Chill, Slice and Garnish
Refrigerate the rolled sushi clusters for at least 1 hour (or up to 24 hours) to firm up completely. When ready to serve, carefully unwrap the plastic and use the sharp knife to slice into ½-inch thick rounds. For clean cuts, dip the knife in warm water between slices to prevent sticking.
Arrange the slices on a serving platter and dust lightly with the remaining powdered sugar using a fine-mesh sieve. For garnish, place 3-4 fresh berries and 1 mint leaf on each serving, or create a berry-mint cluster in the center of the platter. The contrast of tart berries and minty freshness against the sweet, creamy clusters makes this dessert truly special.
Pro Tips For Making Rice Krispie Sushi
- Melt Marshmallows Slowly: I learned this the hard way—dumping mini marshmallows into hot butter too fast turns them into a sticky mess instead of a smooth, glossy coating. Use low heat and add them in small batches, stirring constantly until they’re fully melted but not browned. If you rush, you’ll end up with clumps that ruin the texture.
- Toast Cereal Before Mixing: Skipping the toast step is a mistake—it makes the final sushi dense and gummy. Lightly toast the Rice Krispies in a dry pan for 2-3 minutes until fragrant and slightly puffed. This adds crunch and prevents the cereal from turning mushy when the marshmallow mixture sets.
- Chill the Mixture Fully: Resist the urge to roll your sushi before the filling is completely cool. Let the marshmallow-butter mix sit at room temperature for 10 minutes, then refrigerate for 15-20 minutes. Cold cream cheese and set marshmallows bind better, so your rolls won’t fall apart when slicing.
- Use Room-Temp Cream Cheese: Cold cream cheese is the enemy here—it’ll make your sushi dough tough and crumbly. Take the vanilla cream cheese out of the fridge 30 minutes before mixing, or microwave it for 10 seconds to soften slightly. This ensures a smooth, pliable filling that holds together like it’s supposed to.
Serving suggestions for rice krispie sushi
Plating Like a Pro
Arrange your Rice Krispie sushi rolls on a large, shallow platter with a marble or slate base—these surfaces add elegant contrast. Space the slices evenly, leaving just ¼-inch gaps between each piece. Use a small offset spatula to gently nudge them into place for a clean, restaurant-style presentation. 💫
Garnish Game-Changers
Fresh raspberries and blackberries add vibrant pops of color against the golden clusters. Place 2-3 berries on each serving or create a berry-mint garnish cluster in the center. For a tropical twist, swap berries for mandarin orange segments or dragon fruit slices. The acidity cuts through the sweetness beautifully.
Themed Presentation Ideas
Transform your dessert into a holiday centerpiece by dusting with cinnamon sugar and adding mini chocolate chips as "snow." For a birthday celebration, use a sprinkle of edible gold dust and top with mini fondant flowers.
A picnic-friendly version works best in mini muffin liners—just slice and serve in individual portions.
Serving Tools
Offer small wooden skewers or mini cake picks for guests to easily grab their sushi bites. For a self-serve station, set up a powdered sugar shaker and a small bowl of extra berries on the side.
A chilled glass platter keeps the clusters crisp longer, especially in warm rooms. 🍽️
Kid-Friendly Serving
For little ones, arrange the sushi rolls on colorful paper plates with fun-shaped cutouts (like stars or hearts). Use food-safe markers to draw simple designs on the plates. Serve with mini cups of whipped cream or chocolate syrup for dipping—this makes the experience interactive and exciting for kids.
Make-Ahead Plating
Assemble the sushi rolls completely (including powdered sugar) up to 2 days ahead and store them in an airtight container with parchment paper between layers. Refrigerate until ready to serve—just garnish with fresh berries right before presenting.
This is perfect for holiday parties or last-minute gatherings where you want to impress without stress.
Nutrition facts
Frequently asked questions
Can I make this recipe without cream cheese?
For a lighter version, replace the cream cheese with whipped cream or Nutella mixed with a little frosting to keep it spreadable. If you're avoiding dairy entirely, try vegan cream cheese or coconut cream—just adjust the thickness with a splash of milk if needed. The key is keeping the filling smooth for clean rolls.
How do I prevent the Rice Krispie mixture from sticking to my hands?
Lightly wet your hands with cold water or rub them with a tiny bit of butter before shaping the mixture. If it's still sticky, sprinkle a pinch of powdered sugar onto your work surface and press the mixture into it. Working quickly and keeping the mixture cool (not warm) also helps maintain its shape without sticking.
What’s the best way to store leftovers?
Store unsliced rolls in an airtight container at room temperature for up to 3 days. For longer storage, freeze the entire log (unwrapped) for up to 1 month. To serve, thaw overnight in the fridge and slice fresh. Avoid refrigerating sliced pieces—they’ll soften faster. Dust with powdered sugar just before serving for the best texture.
Can I use this recipe for a gluten-free version?
Yes! Swap regular Rice Krispies for certified gluten-free cereal (like Rice Chex or gluten-free cornflakes). Check the marshmallow package too—some brands contain wheat. For extra binding, add 1 tablespoon cornstarch to the cereal mixture. The texture will be slightly different but still delicious, and the gluten-free swap works perfectly for dietary restrictions.
Why did my rolls fall apart when slicing?
This usually happens if the mixture wasn’t chilled long enough or was packed too tightly. Let the rolled log firm in the fridge for at least 1.5 hours (longer is better). Also, avoid overfilling—stick to the ½-inch border rule. If it’s still crumbling, press the slices gently back together with a tiny dab of frosting as glue before dusting with powdered sugar.