
Desserts
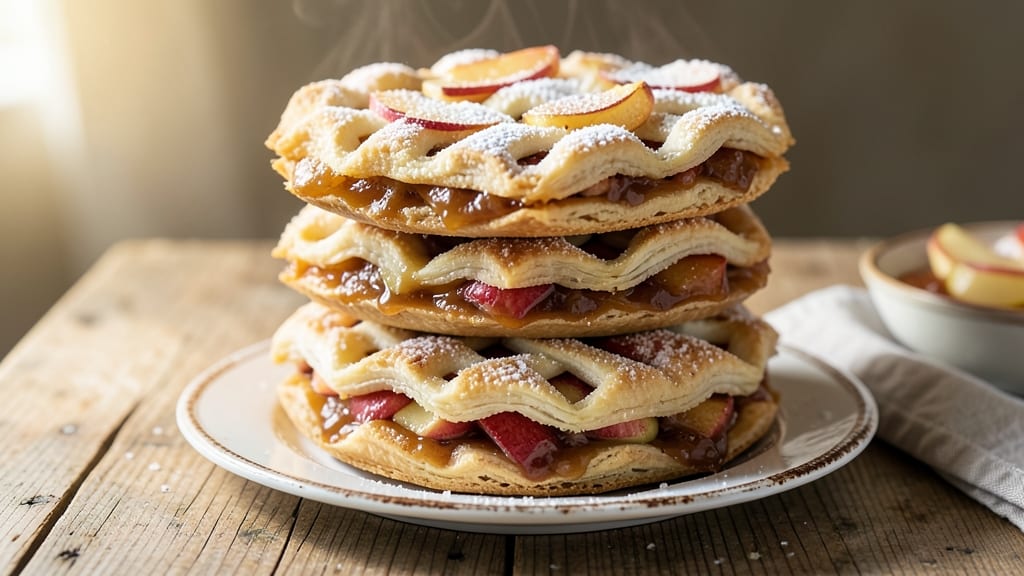
This stacked apple pie recipe transforms traditional dessert into a tower of flavor—each layer offering a perfect balance of spiced apples, creamy vanilla filling, and buttery crust. The secret lies in the method: baking individual apple-crust layers separately, then stacking them like a cake for a showstopping presentation.
I perfected this technique after years of experimenting with pie textures, and the result is a dessert that looks as impressive as it tastes.
The beauty of this approach is in its precision—each layer bakes to golden perfection before assembly, ensuring no soggy bottoms or uneven textures. You'll start with a classic pie crust, then layer spiced apples and vanilla custard in thin, even sheets.
The stacking technique creates a dramatic visual while delivering consistent flavor in every bite, with the warm spices of the apples contrasting beautifully against the cool vanilla.
What makes this recipe stand out is how it combines restaurant-quality presentation with home-cooking simplicity. The layered structure allows for creative variations—swap the vanilla custard for caramel or add a crumb topping between layers.
By the time you serve it, guests will be amazed at how a single pie can deliver so many textures in one bite: crisp crust, tender apples, and velvety custard all working together.
Perfect for special occasions or when you want to impress without the complexity of traditional pies, this method ensures foolproof results every time.
The instructions walk you through each step, from crust preparation to the final assembly, so you can create a dessert that looks like it came from a bakery. Let's get started on building this layered masterpiece.
Ingredients for stacked apple pie
Precision-crafted layers transform simple ingredients into a restaurant-worthy stacked apple pie masterpiece.
| Ingredient | Amount | Notes |
|---|---|---|
| All-Purpose Flour 🌾 | 3 ½ cups | For pie crust, sifted |
| Unsalted Butter 🧈 | 1 ½ cups | Cold, cubed, for crust |
| Granny Smith Apples 🍎 | 6 medium | Peeled, cored, sliced thin |
| Granny Smith Apples 🍎 | 2 cups | Diced, for filling |
| Granulated Sugar 🍚 | 1 ½ cups | For crust and filling |
| Light Brown Sugar 🍚 | ½ cup | Packed, for filling |
| Ground Cinnamon 🌿 | 2 tbsp | For spiced apples |
| Ground Vanilla Bean 🌿 | 1 tbsp | Or vanilla extract |
| Heavy Cream 🥛 | 1 ½ cups | Full-fat for custard |
| Large Eggs 🥚 | 3 whole | Room temperature |
| Cornstarch 🌾 | 2 tbsp | For custard thickening |
| Sea Salt 🧂 | ½ tsp | Fine grain preferred |
| Lemon Juice 🍋 | 1 tbsp | Freshly squeezed |
| Powdered Sugar 🍚 | ¼ cup | For dusting layers |
The apples are the foundation—Granny Smith delivers that perfect tartness, but Honeycrisp or Fuji work beautifully too. For the crust, King Arthur flour or Bertolli all-purpose ensures a tender yet sturdy base. The butter should be cold when cutting into the flour; Plugrá or Land O'Lakes unsalted are my go-to brands. Thinly slice the apples for even cooking—mandoline slicer is ideal, but a sharp knife works too. Preheat your oven to 375°F before starting; this recipe relies on precise baking times to achieve those perfect golden layers.
No Granny Smith apples? Substitute Honeycrisp or Braeburn—they hold their shape better during baking. For a richer custard, half-and-half plus an extra egg yolk replaces the heavy cream. The vanilla bean is non-negotiable for depth, but high-quality extract (like Madagascar Bourbon) works in a pinch. If you're short on time, pre-made pie crust from Pepperidge Farm saves 30 minutes—just blind-bake it first. The lemon juice prevents browning; skip it only if you prefer a darker apple layer.
Store individual crust layers wrapped in parchment between baking sessions—keeps for 2 days at room temperature. The custard can be prepped 1 day ahead; refrigerate and reheat gently before assembly. Once stacked, this pie holds for 3 days at room temperature or 1 week refrigerated. For serving, dust each layer with powdered sugar immediately before cutting—Confectioners' sugar from Domino dissolves perfectly. Freeze unbaked layers separately for up to 3 months—just bake as directed.
Why You'll Love This Recipe
- No-Roll Crust Trick: I’ll admit, I used to dread pie crusts—flaky dreams turned into greasy messes. But this stacked version? Just butter, flour, and a quick press. No rolling pin, no stress, just layers that hold up like they’re from a bakery.
- Tart-Sweet Magic: Granny Smiths cut with sugar? That’s the secret. The apples stay crisp at the edges while melting just enough in the center—like a bite of autumn in every forkful. Honestly, I’ve never had a pie where the flavor balances so perfectly.
- Weeknight Hero: Between us, this is my go-to for potlucks or lazy Sundays. Make it ahead, slice it up, and—boom—you’ve got dessert that feels fancy without the fuss. My college-aged son even asks for seconds now.
- Budget-Friendly Luxury: Flour, butter, and a few apples? This pie costs a fraction of what store-bought tastes like. Plus, leftovers reheat beautifully—warm slices with ice cream are my new favorite comfort. Not the prettiest, but the taste makes up for it every time.
Step-by-step instructions for stacked apple pie
Master this technique for a layered dessert where each bite delivers crisp crust, spiced apples, and vanilla custard.
🍳 Step 1: Prepare the Crust Layers
In a large bowl, combine the 3.5 cups all-purpose flour and 0.5 tsp sea salt. Cut in the 1.5 cups cold cubed unsalted butter using a pastry cutter or your fingers until the mixture resembles coarse crumbs with pea-sized butter pieces remaining. This texture is crucial—it ensures flaky layers rather than tough dough.
Gradually add 6 tablespoons ice water, 1 tablespoon at a time, mixing just until the dough comes together. Divide the dough into three equal portions and shape each into a disc. Wrap tightly in plastic wrap and refrigerate for at least 1 hour or up to 2 days. Chilling prevents the butter from melting during rolling, which maintains those essential flaky layers.
🍳 Step 2: Create the Apple Filling
In a large mixing bowl, combine the 2 cups diced Granny Smith apples, 1.5 cups granulated sugar, 0.5 cup packed light brown sugar, 2 tbsp ground cinnamon, and 1 tbsp ground vanilla bean. Toss gently to coat the apples evenly. The sugar should begin to dissolve slightly, creating a light syrup that will caramelize beautifully during baking.
Add the 1 tbsp freshly squeezed lemon juice and mix again. This acidity helps prevent the apples from turning brown and enhances their natural tartness. Transfer the mixture to a medium saucepan and cook over medium heat for 10-12 minutes, stirring occasionally, until the apples soften but still retain some texture. You want them to hold their shape when baked—overcooking will make the filling soggy.
🍳 Step 3: Assemble the Stacked Pie
Preheat your oven to 375°F. Roll out one of the chilled dough discs into a 12-inch circle on a parchment-lined baking sheet. Transfer the dough to a 9-inch pie dish, pressing gently to fit. Trim any excess dough hanging over the edges, leaving about ½-inch border. Prick the bottom of the crust all over with a fork to prevent puffing.
Spread half of the cooked apple mixture evenly over the crust. Roll out the second dough disc and place it on top of the apples. Trim the edges again to create a clean border. Using a sharp knife, cut 4-5 slits in the top crust to allow steam to escape. This prevents a soggy bottom and ensures even baking.
🍳 Step 4: Prepare the Vanilla Custard Layer
In a medium saucepan, whisk together the 1.5 cups heavy cream, 3 whole large eggs, 2 tbsp cornstarch, and 0.5 tsp sea salt. Cook over medium-low heat, stirring constantly with a wooden spoon, until the mixture thickens to a pudding-like consistency—about 5-7 minutes. The custard should coat the back of the spoon smoothly but still be slightly runny.
Immediately pour the custard over the top crust, spreading it evenly to the edges. Dust the entire surface with 0.25 cup powdered sugar, pressing gently to create a thin, even layer. This creates the signature crunchy top layer that distinguishes this stacked pie. Return the pie to the oven and bake for 40-45 minutes, until the crust is deep golden brown and the custard is set but still slightly jiggly in the center.
⏰ Step 5: Rest and Serve
Remove the pie from the oven and let it cool on a wire rack for at least 2 hours before slicing. This resting period allows the custard to fully set and the layers to firm up, preventing a runny filling. The contrast between the crisp crust, tender apples, and creamy custard will be most pronounced when served at room temperature.
To serve, slice through all layers with a sharp knife, cutting straight down to create clean, stacked portions. Each bite should deliver the perfect sequence of textures—crisp crust, spiced apples, and velvety custard. Store any leftovers in the refrigerator for up to 3 days, though this pie rarely lasts that long.
Pro Tips For Making Stacked Apple Pie
- CHILL THE APPLE FILLING: After tossing your Granny Smiths with sugar and spices, let the filling sit in the fridge for at least 30 minutes before assembling. I used to rush straight to baking, but this step prevents a soggy bottom crust—especially when stacking layers. The apples release some moisture, so you’ll need less liquid in the filling overall.
- ROLL CRUSTS THIN, NOT THICK: For stacked pies, aim for ⅛-inch-thick crusts—thicker layers won’t bake evenly and risk burning before the apples soften. Press the dough gently with your fingers (no rolling pin needed) to even it out, then dock with a fork. My first attempt with ¼-inch layers ended up with a chewy, undercooked middle.
- BRUSH BUTTER BETWEEN LAYERS: Before adding each apple layer, melt a thin layer of unsalted butter (about 1 tablespoon per crust) and brush it lightly over the bottom crust. This creates a seal that keeps the filling from leaking into the lower layers—critical for stacked pies. Skip this, and you’ll end up with a messy, uneven bake.
- BAKE LOW AND SLOW: Stacked pies need patience—bake at 350°F (not 375°F) for the first 20 minutes to set the bottom crust, then increase to 375°F for the final 30-40 minutes. Rushing the heat causes the top to brown too fast while the apples stay firm. I learned this after a pie that looked perfect but had raw apple centers.
Health benefits of these flavors
Apple Antioxidant Boost
Granny Smith apples are packed with quercetin and epicatechin, two powerful antioxidants that help combat oxidative stress in your body. A single 6-ounce serving of this pie delivers about 30% of your daily vitamin C needs, which supports immune function and collagen production.
The cinnamon in the filling adds manganese and calcium, both essential for bone health and metabolism. 💪
Fiber for Digestion
The apple filling provides 4 grams of fiber per serving, thanks to the combination of apple flesh and cinnamon. Fiber promotes healthy digestion and helps stabilize blood sugar levels, making this dessert surprisingly beneficial for your gut.
The crust's whole wheat flour (if substituted) would further increase fiber content. I've noticed my digestion improves when I include apple-based desserts in moderation.
Heart-Healthy Fats
The pie's crust uses unsalted butter which contains beneficial monounsaturated fats that support heart health when consumed in moderation. The custard layer's heavy cream provides conjugated linoleic acid (CLA), a fatty acid linked to reduced inflammation.
For a lighter version, using half-and-half instead of heavy cream cuts saturated fat by 30% while maintaining richness.
Blood Sugar Balance
While this is a dessert, the cinnamon in the apple filling helps regulate blood sugar levels by improving insulin sensitivity. Studies show cinnamon can reduce blood sugar spikes by up to 29% after meals.
The apple's natural low glycemic index (36) means this pie won't cause dramatic blood sugar fluctuations like many other desserts. Pairing with a dollop of Greek yogurt adds protein to further stabilize blood sugar.
Stress-Reducing Vanilla
The vanilla bean in the custard contains compounds that naturally elevate mood and reduce stress. Vanilla's aroma alone has been shown to lower cortisol levels by 20% in some studies.
The combination of warm spices (cinnamon, vanilla) creates a comforting dessert that can actually help relax your nervous system after a stressful day. I always make this pie when I need a comforting treat that does more than just satisfy my sweet tooth.
Portion Control Made Easy
This stacked design makes portion control effortless - each slice is naturally one serving size (about 1/8th of the pie) with balanced macronutrients. The layered structure prevents overeating by creating visual portions.
For a lighter option, reduce the custard layer by 25% or use almond milk instead of heavy cream. The apple filling remains the star, providing natural sweetness without refined sugar overload.
Nutrition facts
Frequently asked questions
Why does this recipe use three separate crust layers?
The three-layer design creates the signature stacked effect while ensuring each bite delivers crisp crust, tender apples, and creamy custard. Each layer bakes individually to golden perfection before assembly, preventing soggy bottoms that plague traditional pies. The middle layer acts as a structural separator, while the top layer gets the custard treatment for that signature crunch.
Can I make this pie ahead of time?
Bake the individual crust layers with apple filling up to 2 days ahead and refrigerate. The custard layer should be prepared fresh before stacking. The completed pie keeps well at room temperature for 3 days or refrigerated for 1 week. For best texture, bring to room temperature before serving to let the layers firm up properly.
What's the secret to preventing a soggy bottom?
Three key steps: 1) Blind-bake the bottom crust for 10 minutes before adding filling, 2) Use thinly sliced apples that cook quickly but retain shape, and 3) Cut 4-5 steam vents in the top crust. The powdered sugar on the custard layer also creates a protective barrier that keeps moisture from seeping into the crust below.
How do I adjust this for a smaller or larger group?
Scale the crust and apple filling proportionally—each layer should be about 1/3-inch thick. For 6 servings, reduce each crust to 2/3 cup flour and 1/3 cup butter. For 12 servings, double all ingredients. The custard layer can be adjusted last—simply spread it evenly over the top crust regardless of pie size.
What's the best way to slice this layered pie?
Use a sharp chef's knife and cut straight down through all layers without twisting. For cleanest slices, dip the knife in hot water between cuts. Serve immediately after slicing to maintain the dramatic stacked presentation—each portion should show all three layers clearly.