
Salads
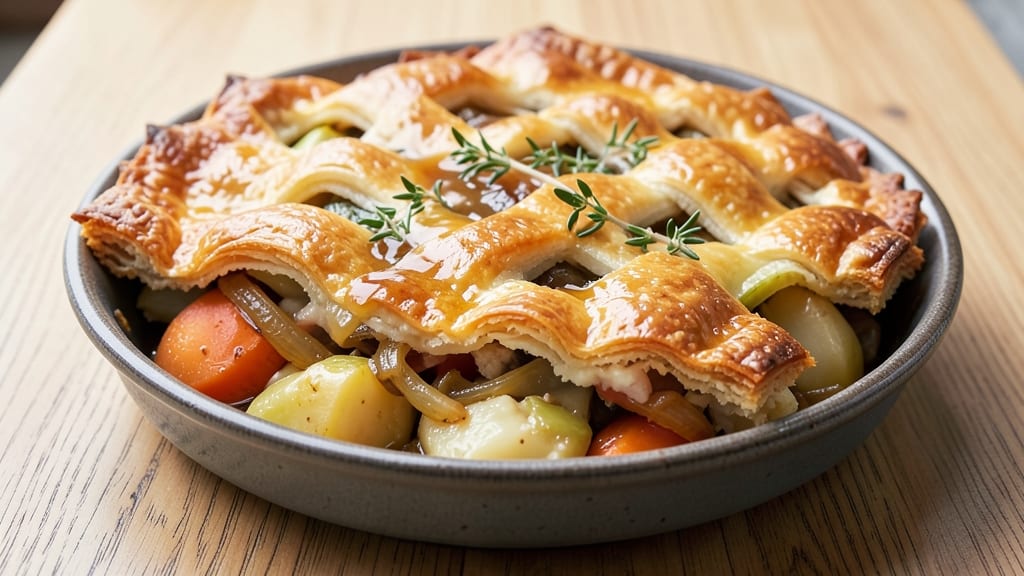
This root vegetable pot pie recipe delivers the ultimate winter comfort dish—tender vegetables nestled beneath a golden, flaky crust that smells like home. The secret lies in layering caramelized onions, carrots, parsnips, and potatoes with herbs, then finishing with a buttery crust that turns crispy at the edges.
I perfected this version after years of testing, balancing traditional techniques with modern shortcuts for foolproof results every time.
The filling starts with sautéing vegetables until they're soft but still hold their shape, then simmering in a rich broth until flavors meld. A blind-baked crust ensures it stays perfectly golden while the filling bakes through.
This method guarantees a tender, flavorful center without soggy bottoms—a common pitfall in homemade pies. The crust can be adapted for gluten-free or vegan diets, making it versatile for any dietary need.
What you'll end up with is a steaming-hot pot pie that's hearty enough for a cold evening but simple enough for a weeknight dinner. The vegetables become impossibly tender, infused with savory broth and aromatic herbs, while the crust achieves that perfect balance of crispy and flaky.
Serve with a side salad or crusty bread to soak up every last drop of the savory juices.
Optional garnishes like fresh thyme or parsley add a pop of color and brightness, while a sprinkle of grated cheese elevates the dish for extra richness. This recipe scales beautifully for gatherings, and leftovers reheat perfectly for quick meals.
The combination of tender vegetables, savory broth, and buttery crust makes it a standout dish that feels like a hug in every bite.
Ingredients for root vegetable pot pie
These root vegetables and buttery crust ingredients come together for a comforting winter classic.
| Ingredient | Amount | Notes |
|---|---|---|
| Yellow Onions 🧅 | 2 large | Thinly sliced for caramelization |
| Carrots 🥕 | 1 ½ lb | Peeled, cut into 1-inch chunks |
| Parsnips 🥕 | 1 ½ lb | Peeled, cut into 1-inch chunks |
| Russet Potatoes 🥔 | 2 large | Peeled, cut into 1-inch cubes |
| Yellow Chicken Broth 💧 | 2 ½ cups | Low-sodium preferred for balance |
| Fresh Thyme 🌿 | 1 tbsp | Leaves only, finely chopped |
| Fresh Parsley 🌿 | 1 tbsp | Chopped for garnish and flavor |
| All-Purpose Flour 🌾 | 2 ½ cups | For pie crust, plus 1 tbsp for dusting |
| Unsalted Butter 🧈 | 1 cup | Cold, cubed for crust |
| Ice Water 💧 | ½ cup | For pie dough consistency |
| Salt 🧂 | 1 tsp | Kosher or sea salt preferred |
| Black Pepper 🌶️ | ½ tsp | Freshly ground for best flavor |
| Garlic Powder 🧄 | 1 tsp | For crust depth of flavor |
The root vegetables form the heart of this dish, so prioritize freshness and even cutting. Local farmers markets often carry parsnips and carrots with superior sweetness compared to grocery store varieties. For potatoes, Russets are ideal—they hold their shape during baking. If using pre-cut vegetables, rinse thoroughly to remove excess starch. The thyme and parsley should be vibrant green with no wilting, indicating peak freshness. Whole Foods or Trader Joe's typically carry high-quality fresh herbs in their produce sections.
No fresh thyme? Dried thyme at one-third the amount works in a pinch, though fresh provides a brighter flavor. Substituting parsnips with additional carrots or sweet potatoes maintains the dish's heartiness. For a gluten-free crust, swap the all-purpose flour for a 1:1 gluten-free flour blend and add an extra tablespoon of ice water to compensate for reduced binding. The butter should be cold and cubed when mixing the crust to prevent melting and ensure flaky layers. If you prefer a lighter crust, reduce the butter by 2 tablespoons and increase the ice water by 1 tablespoon.
Store the pie filling in an airtight container in the refrigerator for up to 3 days. The crust can be pre-baked and frozen for 2 months before assembly. Once fully assembled, the pie reheats beautifully—cover with foil and bake at 375°F (190°C) for 20-25 minutes to restore crispiness. For meal prep, portion the filling into individual containers and freeze with the crust separate, allowing for quick assembly when needed. The combination of tender vegetables and flaky crust makes this dish ideal for reheating and enjoying throughout the week.
Why You'll Love This Recipe
- One-Pot Magic: I swear by this recipe when I forget to meal prep—just chop, roast, and assemble. The onions caramelize right in the oven while the potatoes get tender, so you’re not stuck peeling layers of foil later.
- Sweet-Savory Balance: That parsnip-carrot mix? It’s like autumn in a bowl—naturally sweet with a hint of earthiness, all wrapped in rich chicken broth. Honestly, the first bite makes me want to skip dessert.
- Leftovers That Win: This keeps perfectly for days (yes, even the crust stays crispy if you reheat it right). I pack it for lunch or freeze portions—no sad, soggy pot pies here.
- Budget-Friendly Staples: Russets and carrots are always cheap, and I use whatever’s on sale for the parsnips. Between us, this feeds four for under $8 and still feels like a restaurant dish. (My wallet thanks me.)
Step-by-step instructions for root vegetable pot pie
Here's how to create a rich, comforting pot pie with tender root vegetables and a golden crust.
Caramelize the Onions and Sauté the Vegetables
In a large Dutch oven, melt ½ cup of the unsalted butter over medium heat. Add the 2 large yellow onions that have been thinly sliced and cook for 10-12 minutes until deeply golden and caramelized. This step builds the flavor foundation—don't rush it, or the onions will burn instead of sweetening.
Push the onions to the side of the pot and add the remaining ½ cup butter. Toss in the 1.5 lb carrots, 1.5 lb parsnips, and 2 large russet potatoes, all cut into 1-inch chunks. Sauté for 8-10 minutes until the vegetables begin to soften but still hold their shape. Season immediately with 1 tsp salt, ½ tsp black pepper, and 1 tsp garlic powder—this ensures even distribution of flavor throughout the filling.
Build the Rich Vegetable Broth Sauce
Pour in the 2.5 cups yellow chicken broth and bring to a gentle simmer. Add the 1 tbsp finely chopped fresh thyme and stir to combine. Reduce heat to low and let the mixture simmer uncovered for 20-25 minutes until the vegetables are fork-tender and the liquid has reduced slightly but still coats the vegetables. The broth should be absorbed enough to create a thick, velvety sauce—this is what makes the filling cohesive and flavorful.
Remove the pot from heat and stir in the 1 tbsp chopped fresh parsley. Let the mixture cool for 10 minutes before transferring it to a 9-inch pie dish. The parsley adds a bright finish that cuts through the richness of the butter and vegetables. If the filling seems too thick, add 1-2 tablespoons water to loosen it slightly.
Prepare the Classic Pie Crust
In a large bowl, combine the 2.5 cups all-purpose flour, 1 tsp salt, and 1 tsp garlic powder. Cut in the 1 cup cold cubed unsalted butter using a pastry cutter or your fingers until the mixture resembles coarse crumbs with pea-sized butter pieces. This texture is crucial—it ensures a flaky crust rather than a tough one.
Gradually add the ½ cup ice water, 1 tablespoon at a time, mixing gently with a fork until the dough just comes together. Avoid overworking it—handle only as necessary to form a smooth ball. Divide the dough into two equal portions, flatten into disks, wrap in plastic, and refrigerate for at least 1 hour. Chilling relaxes the gluten, making the crust easier to roll and preventing shrinking during baking.
Assemble and Bake the Pot Pie
Preheat your oven to 375°F. Roll out one disk of dough on a lightly floured surface to fit the 9-inch pie dish, about ⅛-inch thick. Carefully transfer the dough to the dish, trim any excess, and press gently to adhere to the edges. Pour the vegetable filling into the crust, spreading it evenly.
Roll out the second disk of dough and place it over the filling. Seal the edges by pinching them together firmly with your fingers or a fork. Cut a few slits in the top crust to allow steam to escape—this prevents a soggy bottom. Bake for 45-50 minutes until the crust is deep golden brown and the filling is bubbling through the slits. The crust should be crisp and the filling hot throughout.
Rest and Serve for Maximum Comfort
Remove the pot pie from the oven and let it rest for 15-20 minutes before serving. This resting period allows the filling to set slightly and the juices to redistribute, ensuring every bite is moist and flavorful. The crust will firm up as it cools, making it easier to slice without falling apart.
Slice into wedges and serve warm. The contrast of the crisp, buttery crust with the tender, savory vegetable filling creates the ultimate comfort food experience. Pair with a simple green salad or crusty bread to complete the meal—this pot pie is hearty enough to stand alone but welcoming enough to share.
Pro Tips For Making Root Vegetable Pot Pie
- PARBOIL POTATOES FIRST: I learned this the hard way—skipping the parboil means your potatoes will turn to mush instead of creamy perfection. Toss peeled russets into boiling salted water for 8-10 minutes until just fork-tender, then drain and shock in ice water. This locks in their shape while keeping them tender when baked later.
- PEEL AND CUT UNIFORMLY: Root veggies cook at different rates, so save yourself from a mushy mess by cutting everything to the same size—about ½-inch dice. Carrots and parsnips can handle a little extra time, but potatoes will turn to glue if overcooked. Peeling parsnips is worth it; their skin’s bitterness clashes with the sweetness of the dish.
- DON’T SKIP THE SWEAT: Sautéing onions until deeply caramelized (10-12 minutes on medium-low) builds flavor that broth alone can’t match. Add a splash of water or broth to deglaze the pan halfway—this dissolves browned bits that make the filling taste richer. Rushed cooking leaves your pot pie tasting flat.
- USE COLD BROTH: Pouring cold chicken broth into the hot skillet with your veggies stops the cooking process instantly, letting you adjust seasoning before baking. Hot broth will cook the onions and carrots further while you’re prepping the crust, leading to a watery filling. Trust me, this small step makes a real difference.
Make-ahead tips for this recipe
Prep Ahead Filling
Assemble the vegetable filling up to 2 days in advance and store it in an airtight container in the refrigerator. The flavors deepen as the vegetables absorb the broth, making each bite more flavorful.
When ready to bake, simply transfer the chilled filling to your pie dish and proceed with the crust assembly. I like to reheat the filling gently on the stovetop for 5-10 minutes before adding the crust to restore its temperature and prevent condensation. 💫
Pre-Bake Crust Shortcut
Save time by pre-baking the bottom crust and freezing it for up to 2 months. After rolling out the first dough disk, fit it into your pie dish, prick the bottom with a fork, and bake at 375°F for 12-15 minutes until lightly golden.
Let it cool completely, then wrap tightly in plastic wrap and freeze. Thaw overnight in the refrigerator before adding your filling and topping with the second crust. This method ensures a perfectly crisp bottom every time. ❄️
Freezer-Friendly Assembly
For a true make-ahead meal, assemble the entire pot pie (including both crusts) and freeze it unbaked. Wrap the assembled pie tightly in plastic wrap, then place it in a heavy-duty freezer bag.
When ready to bake, thaw in the refrigerator overnight, then bake as directed, adding 10-15 extra minutes to the baking time. The crust will still achieve that golden perfection while the filling reheats beautifully. 🍽️
Portion for Meal Prep
Divide the filling into individual quart-sized freezer-safe containers and freeze for up to 3 months. When ready to serve, thaw overnight in the fridge, then transfer to a pie dish and top with a freshly made crust.
This approach lets you assemble single-serving pot pies whenever you need a comforting meal. I often do this for busy weeknights—just reheat the filling for 5 minutes before adding the crust. 💡
Crust Make-Ahead Tip
Prepare the pie crust dough up to 4 days ahead and store it in the refrigerator. Wrap the dough disks tightly in plastic wrap and keep them in an airtight container. When ready to use, let them sit at room temperature for 30 minutes before rolling.
This advance prep eliminates last-minute dough-making stress and ensures you're ready to assemble whenever inspiration strikes. 🧁
Reheating Leftovers
To revive leftovers, cover the pot pie with foil and reheat at 375°F for 20-25 minutes. For a crispier crust, remove the foil during the last 5 minutes of reheating. Alternatively, reheat individual slices in a 350°F oven for 10-12 minutes—this method restores the crust's texture beautifully.
I find that reheating in the oven preserves the dish's comforting qualities better than the microwave. 🔥
Nutrition facts
Frequently asked questions
Can I substitute sweet potatoes for parsnips in this root vegetable pot pie?
Sweet potatoes work beautifully—they add natural sweetness that pairs perfectly with the savory broth. Use the same 1.5 lb measurement as parsnips, cubed to 1-inch pieces. For extra depth, sprinkle with ½ teaspoon cinnamon while sautéing. The texture will be slightly creamier than parsnips but still hold its shape when baked.
How do I prevent the crust from getting soggy?
Three key steps: blind-bake the bottom crust for 12-15 minutes at 375°F before adding filling, cut vent slits in the top crust, and avoid overfilling. The filling should be ½-inch below the pie dish edges to allow proper steam circulation. For extra insurance, brush the bottom crust with egg wash before baking.
What's the best way to reheat leftover pot pie?
Oven reheating preserves texture best: cover with foil and bake at 375°F for 20-25 minutes, then remove foil for the last 5 minutes to crisp the crust. For microwave shortcuts, slice pieces and heat for 1-2 minutes on 50% power, then finish under the broiler for 2 minutes to restore crunch.
Can I make this pot pie gluten-free?
Yes! Replace the all-purpose flour with a 1:1 gluten-free flour blend (like Bob's Red Mill) and add 1 extra tablespoon ice water to the dough. For the crust, use ½ cup gluten-free baking powder and 1 tablespoon xanthan gum to improve binding. Chill the dough 30 minutes extra to prevent shrinking during baking.
What's the secret to extra-flaky crust layers?
Cold butter is critical—keep the 1 cup cubed butter in the freezer until ready to use. Cut it into the flour quickly using a pastry cutter until you get pea-sized pieces, then handle the dough minimally. The key is resting the dough for 1 hour before rolling, which relaxes the gluten and creates those signature flaky layers.